The Laser
Devices
Create your machine's profile — from the catalog, the connected laser or an .lbdev file — and adjust motion, scanning offset, Z axis and G-code.
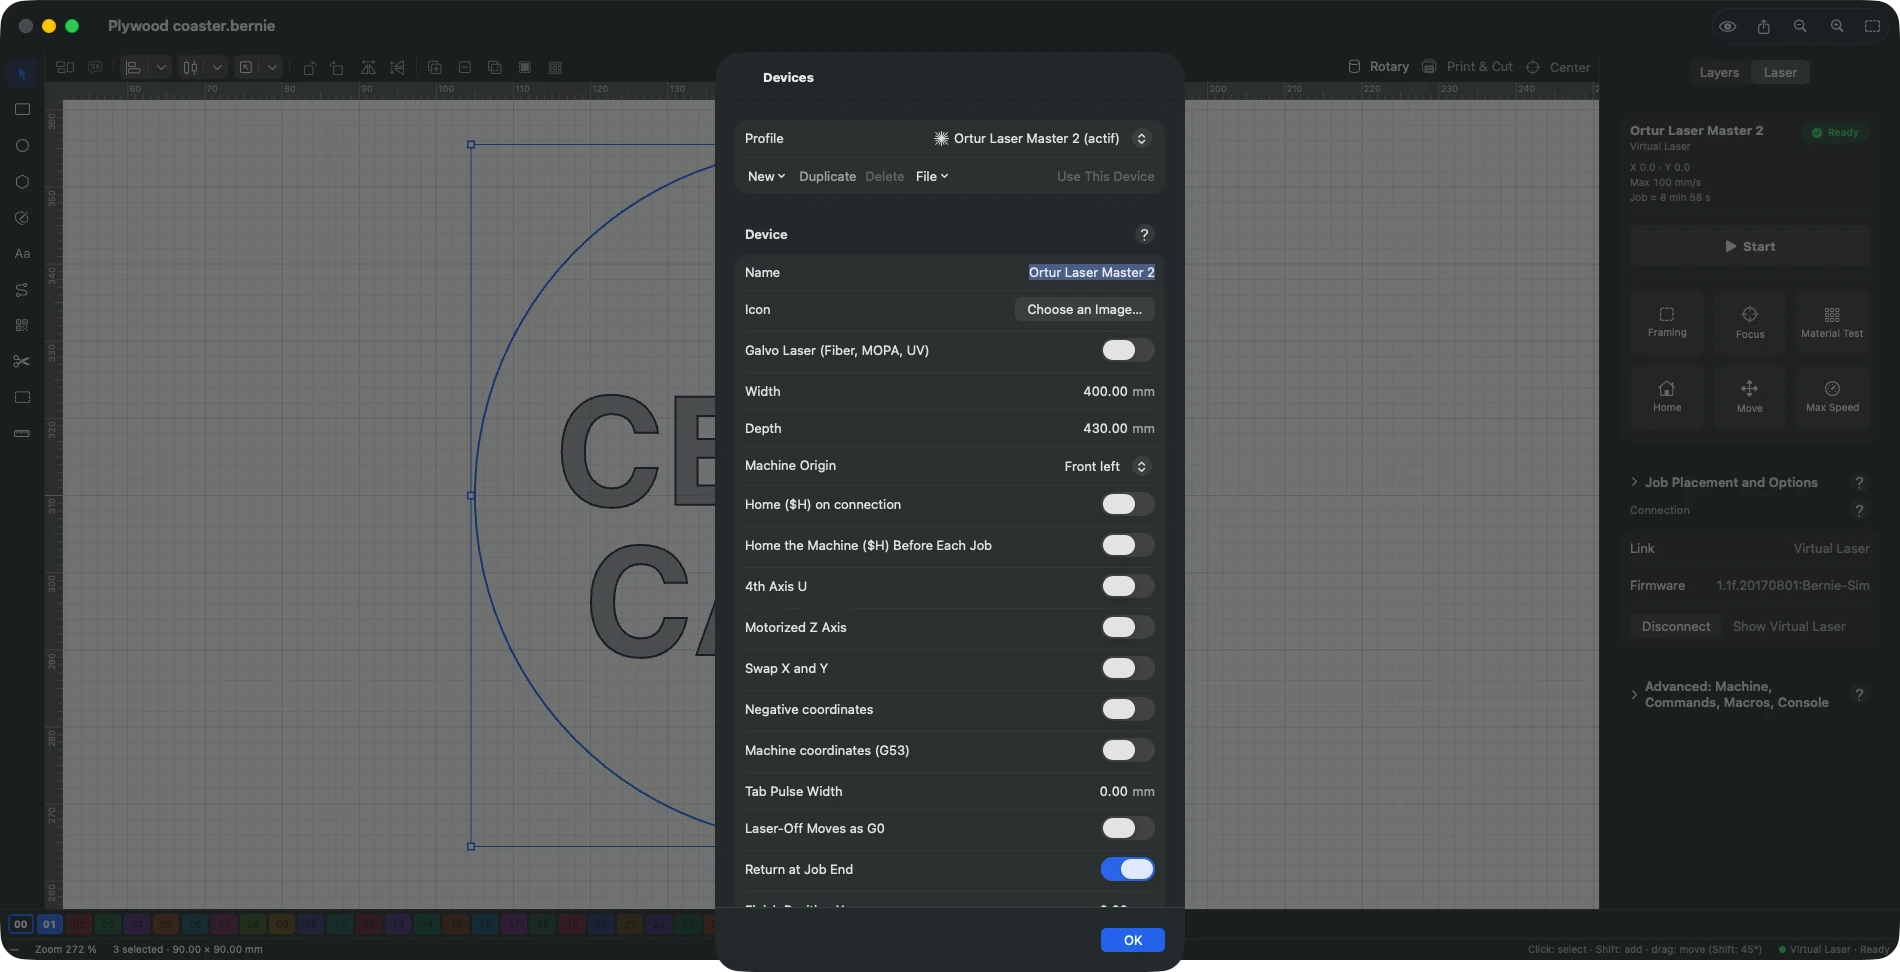
Settings › Devices: New starts from a template, from a Commercial machine, grouped by brand (Acmer, Atomstack, BlazeX, Creality, Emblaser, K40, LaserPecker, Longer, Makera, Mecpow, NEJE, Ortur, Sculpfun, Snapmaker, TwoTrees, xTool, G-code MOPA source: the model’s work area, the actual travel being read back on connection; depending on the machine, port speed, macros, start G-code and scan offset compensation; in Bernie Studio, the profile’s “Commercial machine” list), or From the Connected Laser (GRBL) — work area, maximum power, speeds and accelerations read from the controller. A machine marked “file preparation only” has a controller Bernie does not drive: the profile is used to prepare jobs at the right size. Export This Profile… saves the profile as a JSON file, which you can edit and import again. Import a profile (Bernie, .lbdev)… reads a Bernie profile or a .lbdev device profile: each device in the file becomes a profile (the first one is shown), its macros are added to those of the Laser panel (a macro with the same name is replaced), and a “Device added” window lists what has no equivalent in Bernie (process offset, unsupported controller…). Recognized controllers: GRBL and its variants (GRBL-M3, GRBL-LPC, Gerbil), Marlin, Smoothieware, custom G-code (Duet / RepRapFirmware flavor included); a JCZ galvo board becomes a galvo profile whose field is the work area (board settings and lens corrections: Import an EZCad Configuration); a Ruida is kept to prepare jobs, sent with the Ruida export. Work area, machine origin, firmware (GRBL, Marlin, Smoothieware), S max, baud rate, air assist, G-code added at the start and end of the job, return at job end. Icon: an image of your own for the laser (reduced to 128 pixels), shown next to its name in the profile list.
Ortur and Aufero
The whole range is in the catalog, older models included (Laser Master 1, 2, 2 S2, 2 Pro, 3, 3 LE and H10; H20, F10, R1 and R2; Aufero Laser 1, 2 and 3), over USB at 115,200 baud. Find My Laser reads the model name from the controller. On the Laser Master 3, H20, R1 and R2, pick the line for your module: the work area depends on it. A Laser Master 3 can start in alarm 11: run homing; over Wi-Fi, it answers at its address, port 23. The R1 only starts with its USB key. Extension kit: set the profile’s depth and $131 on the controller (800 mm for the Laser Master 2 S2 and 2 Pro, 850 mm for the Laser Master 3, 600 mm for the Aufero Laser 2).
xTool D1 and D1 Pro
Over USB at 230,400 baud (catalog machine, or pick that speed when connecting). Their firmware, close to GRBL, is recognized when connecting: Bernie asks for the position with a “?” sent as a line, works out the machine state from it and sends the job one line at a time. On these machines there is no speed or power override during a job and no cancelling a jog once started; Stop resets the controller. The controller acknowledges every command, even a wrong one, without reporting an error: double-check what you type in the console.
Other xTool machines
The D1 Pro 2.0 and the S1 also connect over USB (same firmware, 230,400 baud). The M1, M1 Ultra, P2, P2S and the F1, F1 Lite, F1 Ultra and F2 Ultra galvos have no serial port for G-code: Bernie sends them the job over the network — see Networked xTool. The M2 (files specific to xTool Studio) is not supported.
AtomStack
The whole GRBL range is in the catalog (A5 to A70, P7, P9, S10 to S40, X7 to X70), over USB at 115,200 baud; the recent P1, P1 Dual, Swift, Swift Mini, Kraft, Glacier and the Hurricane CO2 (GRBL board) at 460,800 baud. The M4 and M4 Pro galvos (another maker’s board) are not supported.
Longer Nano and Nano Pro
A diode galvo running GRBL, 100 × 100 mm. Over USB at 921,600 baud; over Wi-Fi, join the machine’s LongerLaser_Nano… network, then connect to the address 192.168.0.1:8847. Carving mode ($nano/work/mode=1) is sent when you connect; Commands on Connect, in the profile’s added G-code, serves any machine that must first be put in a mode. Extensions: macro Switch Slide Extension (set the work area to 100 × 300 mm in the profile) and macro Switch Rotary Extension (enter the workpiece diameter after workpiece=). Before running Connect to WIFI, enter your network’s name and password in it. For fills and images, Longer specifies a 0.06 or 0.09 mm interval and the Atkinson, Stucki or Jarvis dithers; focus at 151 mm below the module (Pro) or 110 mm (Nano). This profile follows Longer’s file and has not yet been tried on a real machine.
- Motion: maximum speeds and accelerations (“Read from the connected laser” button) — used for the estimated time and automatic overscan.
- Scanning offset: if, in fast bidirectional engraving, every other line is shifted: 1. engrave the pattern (Laser › Material Test…, “Scanning offset pattern” preset), the first time with compensation off; 2. on each strip, measure the gap between the edges of the forward and return lines; 3. Add a Pattern Measurement: strip speed and measured gap; Bernie keeps half of it. If compensation is already on, the measured gap is what remains: half of it is added to the current offset (negative gap if the edges have reversed).
Import… reads a LightBurn table: .lbso file, .lbdev device profile or .lbzip settings bundle, or plain text with “speed offset” on each line. Export… saves it as .lbso. In Bernie Studio, the same table is in the device settings, collapsible Scanning offset section.
- Positioning aids: low-power manual fire (to be allowed here), red pointer offset.
- Motorized Z axis: layers then offer a Z offset (head height for this layer, relative to focus) and, from two passes, a Z step per pass to follow the cut into thick material. The head returns to Z 0 at the end of the job. Relative Z moves: for a machine without a Z home, the starting height is the focus and Z moves are relative (G91). Autofocus: the machine’s autofocus command (e.g.
$HZ, one command per line); the Laser panel then shows a Autofocus button. A command that would turn the laser on (M3, M4, non-zero S) is refused. Material height (Laser panel, absolute Z moves): the workpiece thickness, added to each layer’s Z height so the focus follows its surface; saved with the project. A height unchanged from one pass to the next produces no Z move. - Custom G-code: for a controller with unusual G-code, each command comes from an editable template — job header (metric units block
G21or, when Coordinates in inches is checked, imperial unitsG20— positions in inches, speeds in inches per minute —, then the work coordinate systemG54toG59), job start and end, layer start, laser on and off (once per layer, or around each cut for an on/off controller), rapid move, cut move, dwell, air, Z axis, progress (M73), start and end delays. Variables:{x}{y}{z},{s}/{speed}(mm/min),{p}/{power}(S value),{dwell},{layer},{percent},{remaining};[X]{x}writes the letter only when the value changes,{*power}writes the line only when the value changes;|REL|/|ABS|…|RESTORE|switch to relative or absolute coordinates;{rotary_diameter}gives the rotary diameter (mm);{freq}(kHz) or{freq_hz}and{qpulse}(ns) give the layer’s frequency and pulse width, for a MOPA source — as soon as a template uses them, the layer settings offer Frequency and Pulse Width. Escapes:\n(new line),\t,\xHH(character with code HH, for control characters). Prohibited characters: removed from every line written (layer names included). Error and alarm messages: onenumber = messageline per code; they replace GRBL’s in the console and alerts. The preview shows the G-code of a 20 mm square; the machine link stays that of the chosen controller. Controller templates: Duet / RepRapFirmware (laser modeM452set inconfig.g,Spower from 0 to 255 on each cut,G0with the laser off, line-by-line link like Marlin), Mach3 / Mach4 and UCCNC (laser driven like a spindle:M3before each run of cuts,M5before each rapid move,Sfrom 0 to 1000,M30at the end) set the templates, maximum power and link in one go — check them on the machine. FluidNC and grblHAL speak GRBL: choose GRBL. - Tab pulse width: low-power tabs are then cut as full-power pulses of this length, spaced to give the same average power — useful on controllers that change power poorly mid-line; 0: reduced power.
- Swap X and Y: for a machine mounted a quarter turn around. Laser-off moves as G0: faster overscan and scan gaps on some controllers (their speed is no longer controlled).
- Tool: Laser, or Scribe (diamond) — the scribe goes down in Z (Working Z, e.g. −0.3 mm, at the plunge speed) to mark and lifts (Clearance Z) for travel moves: no laser and no power, every line of the job is marked, even from a layer at 0 %; no overscan or ramp; an image is engraved with a threshold, dot by dot (very slow: prefer a fill, the pre-flight check says so). With custom G-code, “Laser on” and “Laser off” lower and lift the scribe around each run of lines. The virtual laser marks the lines drawn with the scribe down. Pen (plotter): for a GRBL pen plotter, the pen goes down to draw and up for travel moves, like the scribe. Pen lift: Servo (pen moved by a servo on the spindle output: Pen down command,
M3 S1000by default, Pen up command,M5, then Servo wait, 0.2 s, while it moves; GRBL laser mode off,$32=0) or Z axis (heights and plunge speed, like the scribe). Lines recommended; a fill draws hatching. Knife (cutter): blade offset and overcut — see Cutters and Plotters. - G-code clustering (GRBL, Smoothieware): in image engraving, several neighbouring dots of a line go out in a single
G1(S a:b:c…, the path split into equal parts, Values per line: 2 to 16) — fewer lines to send, smoother high-resolution engraving; a run of a single power stays an ordinaryG1. Only if the controller announces it ([CLUSTER:n]in its$Ireply: grblHAL with the “LightBurn clusters” plugin, some Ortur): otherwise starting a job is refused, as the controller would answererror:1. The virtual laser accepts it. - Negative coordinates: CNC-type machine (converted 3018 router…) whose origin, after homing, is a corner and whose work area extends into negative values; positions are sent as X−, Y−.
- Machine coordinates (G53) (GRBL): jobs in absolute coordinates, framing and moves to a point ignore the G54 work offset; the head position is read in machine coordinates. No effect from the current position (G92) or with the rotary.
- The device list is sorted by name.
- Manufacturer (laser manufacturer bundle): name and links (website, training, support, community) of the device’s manufacturer. A manufacturer fills them in, then exports a settings bundle (devices, libraries); for their customers, imported devices show their menu in Help (Bernie Studio: links in the manual window). Only web addresses (https) become links.
- 4th Axis U: for a controller with a U axis (table, rotary…); each layer then has a U Position (layer settings), sent at the start of the layer (
G0 U…) only when it changes. Without this checkbox, it is ignored. - Device at launch (Mac):
open -a Bernie --args -appareil "Device name"opens Bernie with that device active — handy for one shortcut per machine in a workshop with several lasers. An unknown name is reported in the status bar and the active device is kept.
This manual is also built into Bernie: press F1, or open the Help menu, to read the topic for what you are doing. A mistake, a missing answer? Tell us
Try it in Bernie, for free.
Free laser engraving and cutting software for diode, CO2, fiber and galvo lasers. Windows, Mac, Linux, iPad, iPhone and in the browser.