To laser cut Christmas ornaments, draw a closed outline with a hanging hole, put the decoration and the name on an engraving layer and the outline on a cutting layer, then engrave first and cut last. Use 3 mm laser-grade plywood or basswood: it cuts in one to three passes on a 10 W diode and in a single pass on a CO2 laser, and it is light enough to hang on a branch. A test on an offcut of the same sheet gives you the speed and power before the first real ornament.
Below: the materials that work, the design rules that keep an ornament in one piece, starting settings for diode and CO2 lasers, and a complete tutorial in free software for an 80 mm ornament with a snowflake, a curved greeting and a name. The last steps turn one ornament into a batch with a different name on each.
Which material for laser cut Christmas ornaments?
| Material | Thickness | Good for | Watch out for |
|---|---|---|---|
| Birch or poplar plywood (laser grade) | 3 mm | Most ornaments: engraves well, cuts cleanly | Glue lines and voids in cheap plywood stop the cut |
| Basswood | 2–3 mm | Fine detail, light color, even engraving | Softer: delicate parts break |
| MDF | 3 mm | Painted ornaments | Slow to cut, heavy smoke, brown edges |
| Cast acrylic (CO2 only for clear) | 3 mm | Engraved clear ornaments, edge-lit pieces | A diode laser cannot cut clear acrylic |
| Card stock | 0.5–1 mm | Tags and paper snowflakes | Catches fire: low power, air assist, never unattended |
For a first batch, 3 mm birch or poplar plywood sold for lasers is the safe choice: it is cheap, it engraves a clear brown mark and it cuts in a predictable way. Thicker wood looks sturdier but takes more passes and darker edges on a diode laser. Never cut PVC or vinyl, whatever the color: they release chlorine, which is toxic and corrodes the machine.
Design rules that keep an ornament in one piece
- One closed outline. The cut must be a single closed shape around the ornament. If the hanging loop is a separate circle, merge it with the body (a union) or the laser cuts it off.
- A hole away from the edge. 4 to 5 mm across, with at least 3 mm of wood all around it, or the loop snaps when you thread the ribbon.
- Bridges of 2 mm or more. In a cut-out snowflake or a lacy pattern, thin wood between two cuts burns away or breaks. On a diode laser, 2 to 3 mm is a safe minimum in 3 mm plywood.
- Engrave, do not cut, the details. A snowflake, a reindeer or a name engraved in fill stays solid; cut-outs are prettier but more fragile.
- Text that holds up. At 4 to 5 mm high, a bold sans serif stays readable; a script font needs 8 mm or more, with its letters welded into a single outline so overlaps do not engrave twice.
- Engrave before you cut. Once the outline is cut, the ornament can shift or drop slightly, and the engraving lands off center.
Size and weight
Most wooden ornaments are 60 to 90 mm across (about 2.5 to 3.5 inches). Bigger is easier to engrave and to read, but a branch bends under a heavy piece: in 3 mm plywood, 80 mm is a good balance.
Starting settings for 3 mm plywood
These are starting points for laser-grade 3 mm plywood, the same ones as in our guide to a laser not cutting through. The glue and the batch of wood change everything, so run a quick test on an offcut of your sheet before a batch.
| Laser (optical power) | Engraving (fill) | Cutting 3 mm plywood |
|---|---|---|
| Diode 5 W | 50–80 mm/s, 50–70 % | 3 mm/s, 100 %, 3 passes |
| Diode 10 W | 80–100 mm/s, 30–40 % | 6 mm/s, 100 %, 2 passes |
| Diode 20 W | 100–150 mm/s, 20–30 % | 10 mm/s, 100 %, 1 pass |
| CO2 40 to 60 W | 250–400 mm/s, 15–35 % | 15 mm/s, 65 %, 1 pass |
For engraving, a line interval of 0.1 mm gives a solid, even fill on wood; a finer interval darkens the mark but doubles the time. Air assist keeps the cut clean and the edges lighter, and masking tape on the surface stops the smoke from staining the wood around the engraving. Our guide to laser engraving settings by material explains how to find your own values.
How to laser cut a personalized Christmas ornament in Bernie
Bernie is free laser engraving and cutting software, funded by donations. It has the drawing and text tools an ornament needs, and it drives the lasers most people use at home, listed on the compatibility page. Here is the whole job, from a blank page to the cut, for an 80 mm round ornament in 3 mm plywood.
- Draw the body. Pick the Ellipse (E) tool, hold Shift and drag a circle, then type 80 × 80 mm in the inspector. Put it on the layer you will use for cutting.
- Add the hanging loop. Draw a second circle of 16 mm, centered on the top edge of the body so that half of it sticks out. Select both circles and choose Shapes › Union: they become a single outline.
- Make the hole. Draw a 5 mm circle in the middle of the loop. Select the outline first, then Shift-click the small circle, and choose Shapes › Subtract (Remove the Last Selected Shape): the hole is cut out of the outline.
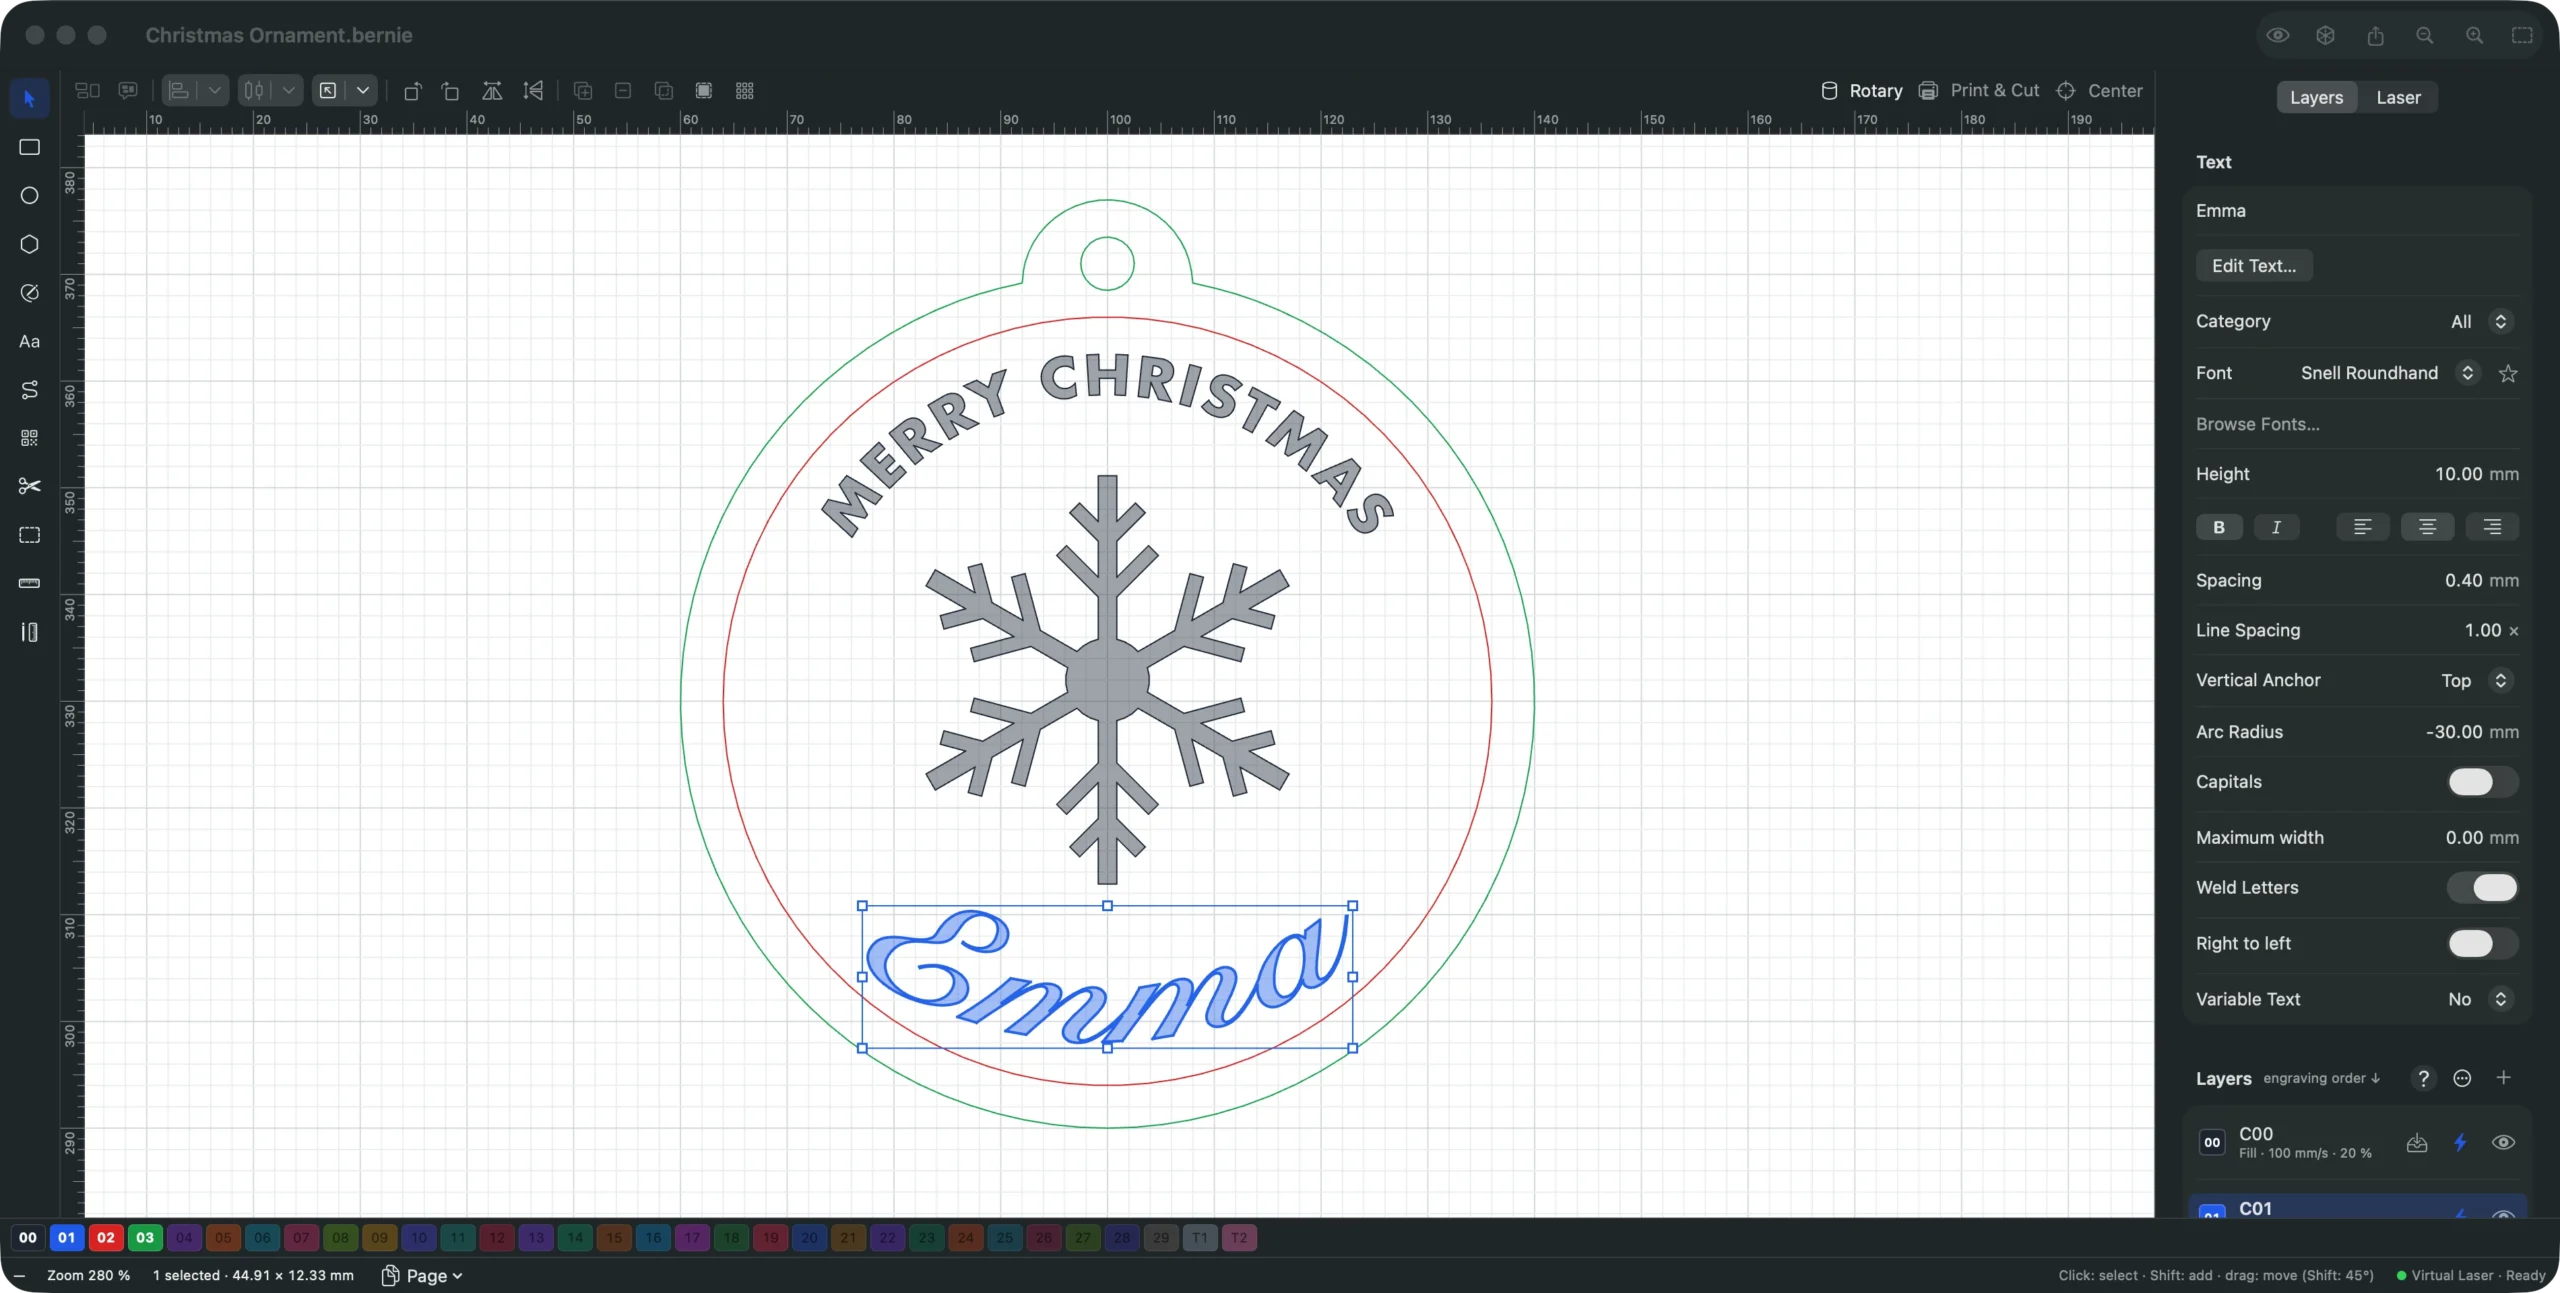
- Add an engraved border. Click + next to Layers to add a layer, then draw a 72 mm circle centered on the body (or select an 80 mm copy and use Shapes › Offset Shape…, inward, 4 mm). Leave this layer in Line mode with a low power: it scores a thin ring instead of cutting.
- Place the decoration. Add another layer and set its Mode to Fill. Use File › Import… for a snowflake or any SVG drawing of your own (a design you made or one you have the right to use), or draw a star with the Polygon (P) tool and its Star option. Size it to about 34 mm in the inspector and center it.
- Write the greeting on an arc. With the Text (T) tool, click and type MERRY CHRISTMAS, choose a bold font at 4 mm, then set the Arc Radius to 28 mm in the inspector so the text follows the top of the border. Our tutorial on how to curve text covers arcs, circles and paths in detail.
- Add the name. Add a text at the bottom on its own Fill layer, in a script font at 10 mm, turn on Weld Letters so the overlapping letters become one outline, and give it a negative Arc Radius (-30 mm) so it curves along the bottom edge.
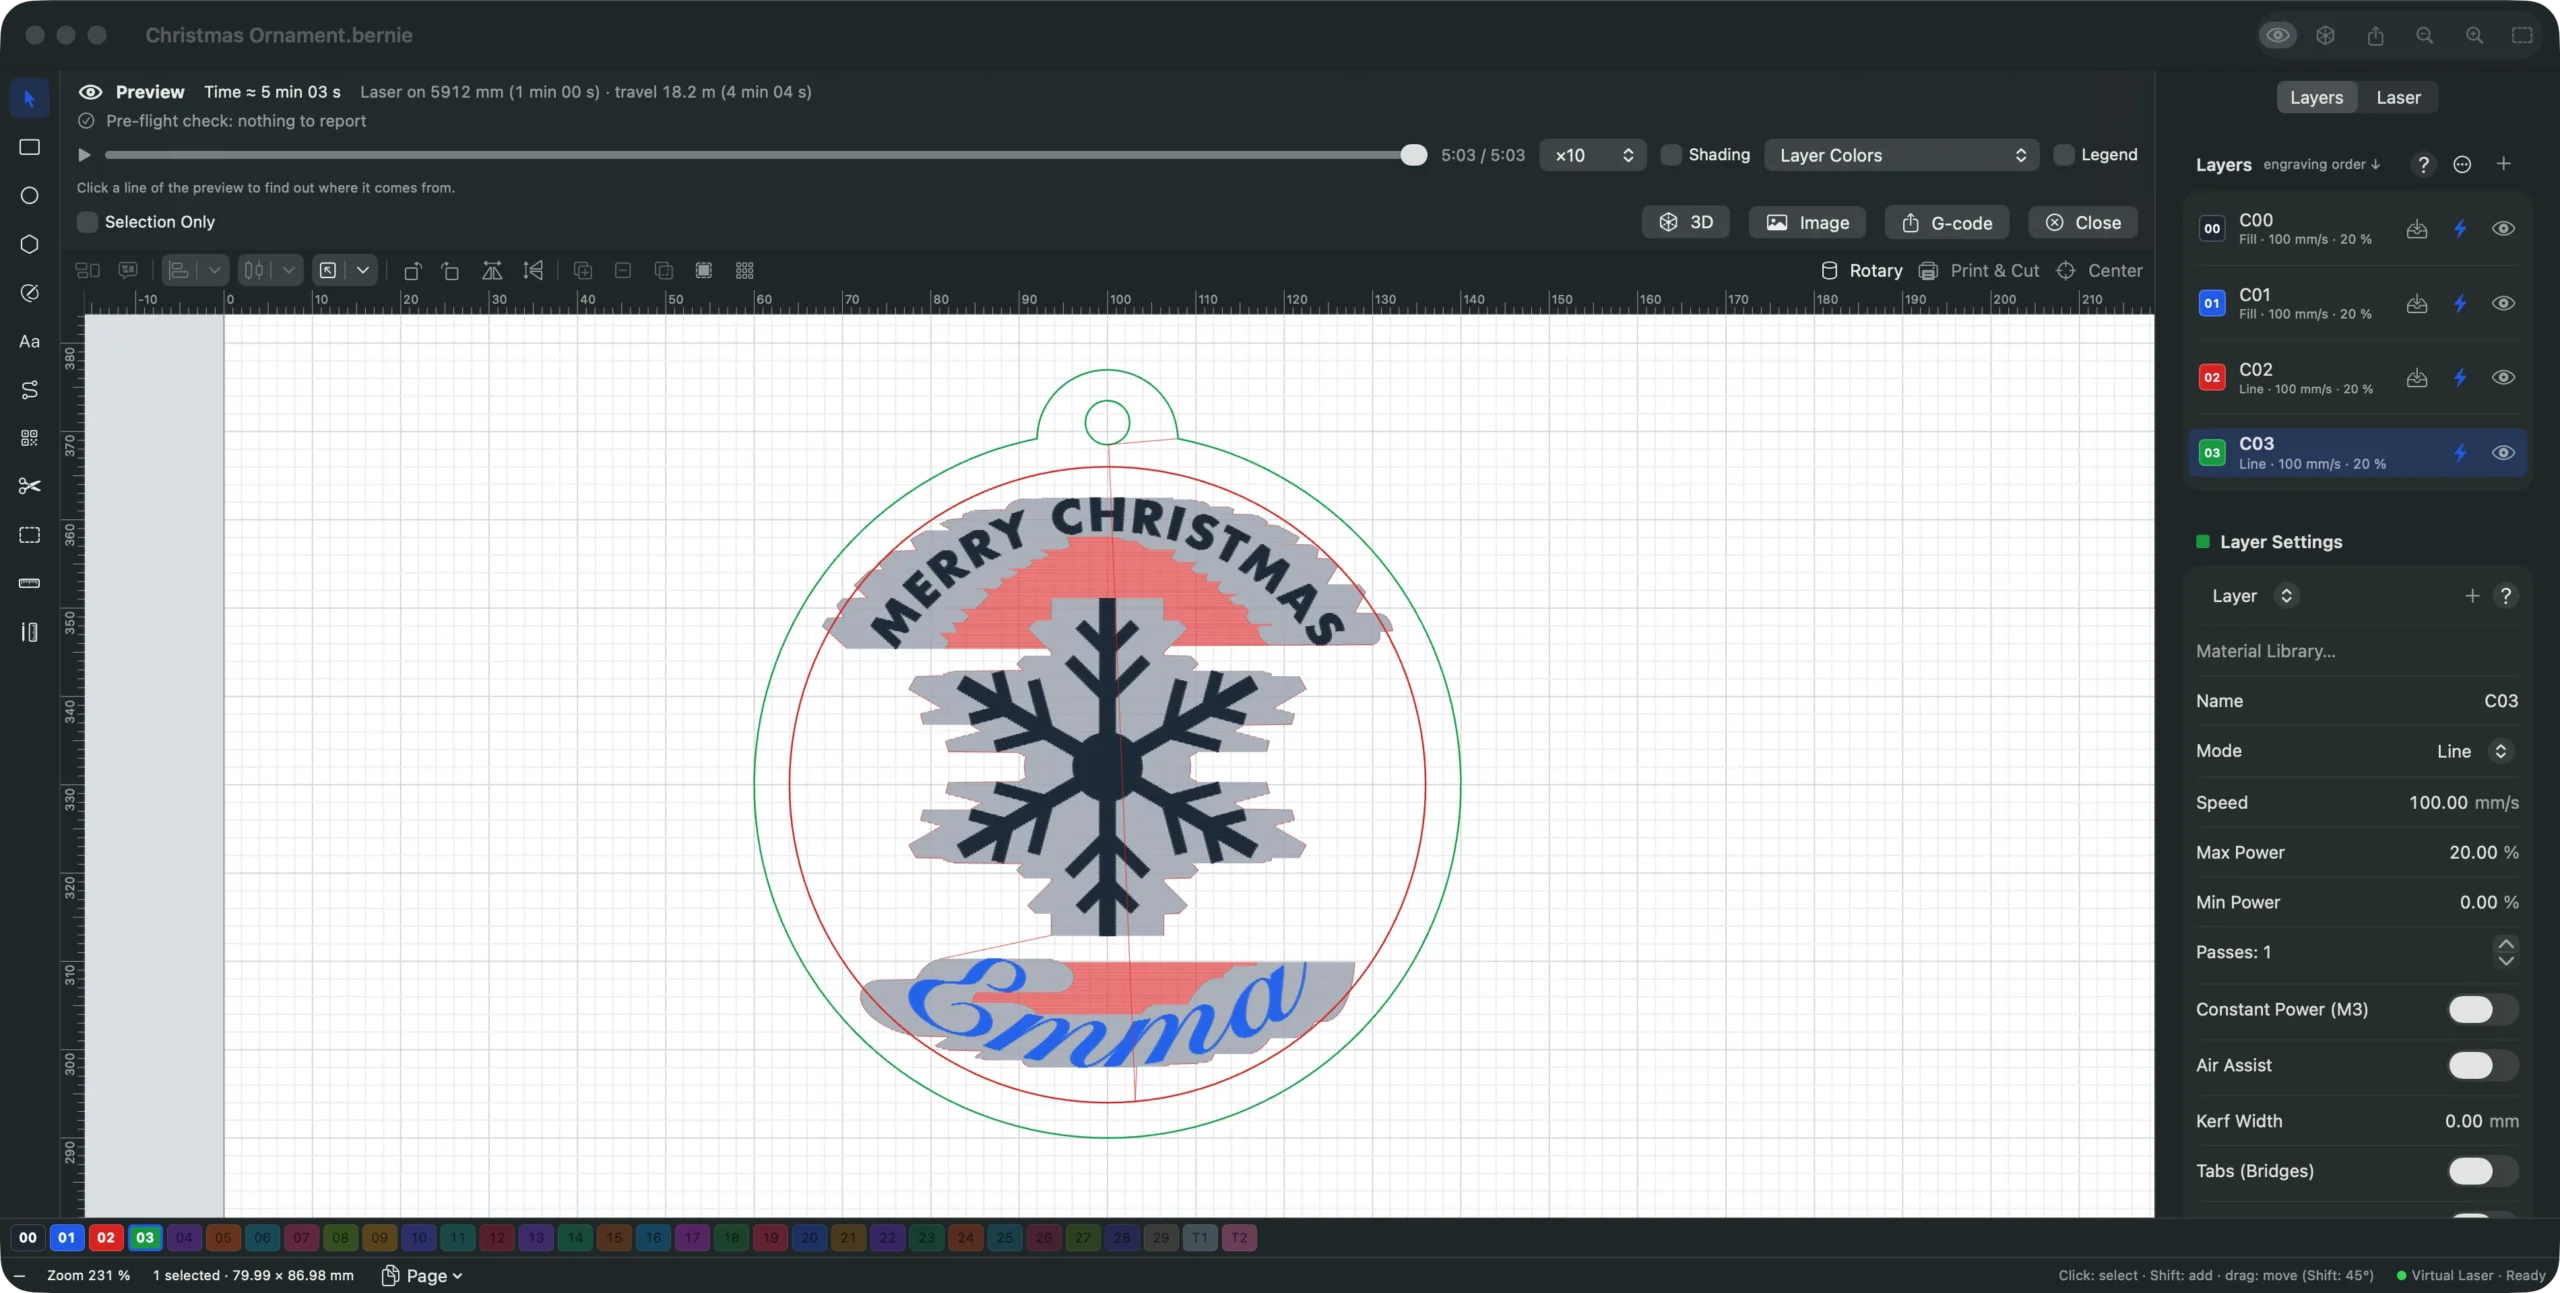
- Set the layers. Give the Fill layers the engraving settings of your laser and an interval of 0.1 mm, the border a fast, light Line, and the outline the cutting settings (full power, two passes on a 10 W diode, air assist on). Drag the cutting layer to the bottom of the Layers list, or long-press + and choose Sort: Cuts Last: layers run from top to bottom.
- Check the preview. Click the eye button (⇧⌘P): the paths run engraving first, cut last, with the estimated time. The Pre-flight check flags open shapes on a Fill layer, duplicates or a cut planned before the engraving it surrounds. A click on a line, with Why this line?, tells you what it is.
- Frame and start. Connect the laser in the Laser panel, place the plywood, click Frame: the head traces the outline of the job, laser off, so you can check that it fits the sheet. Close the enclosure or put on your goggles, then click Start and confirm. Stay next to the machine until the last cut.
The preview and pre-flight check page shows what the checks catch, and the manual’s Editing Shapes section lists every shape operation, from Union to Offset Shape.
Cut your first ornament for free
Repeat these steps with your own laser: Bernie is free, with no account and no subscription. It runs on Mac, Windows and Linux, and in Chrome or Edge with Bernie Studio, which reaches a USB laser through WebSerial.
Make a batch with a different name on each
Ornaments are the classic Christmas gift and the classic craft-fair item, and the name is what makes each one personal. You do not need to retype it fifty times.
- Prepare the list. Write the names in a spreadsheet, one per row, and save it as a CSV file.
- Make the name variable. Select the name, open its Variable Text list and choose CSV Merge, then type
%0as its text: it takes the first column of the current row. Variable Text… picks the CSV file. - Lay out a sheet. Select the whole ornament and use Arrange › Array… with Variable Text: Step per Copy: each copy takes the next row, so a sheet of 3 × 3 ornaments gets nine different names.
- Check the names before you cut. Show in Preview shows the real names in the preview, so a long name that runs off the arc is caught before the laser starts.
The same method numbers raffle tags or prints the year on every piece. The manual’s Text and Codes section details every variable text code.
Common problems and quick fixes
| Problem | Likely cause | Fix |
|---|---|---|
| The loop falls off | Loop and body are two separate outlines | Select both and use Union before cutting |
| The hole is not cut | The small circle is on an engraving layer, or was subtracted twice | Put it on the cutting layer, or make it part of the outline with Subtract |
| Cut stops in spots | Glue line or void in the plywood, or not enough energy | One more pass, laser-grade plywood, check the focus |
| Script name engraves darker where letters overlap | Letters not welded | Turn on Weld Letters |
| Engraving slightly off center | The ornament moved after a cut | Cuts last; hold the sheet flat |
| Brown smoke stains around the engraving | No masking, weak extraction | Masking tape, air assist, better extraction |
If the cut is the problem, the full checklist is in our guide to a laser not cutting through.
Safety
Wood burns. Run a laser cutter only while you are watching it, with an extinguisher within reach, fume extraction or ventilation on, and goggles made for your laser’s wavelength if the machine is open. Clear the honeycomb of small scraps between batches: dozens of ornament offcuts make good kindling. And keep PVC, vinyl and any unknown plastic away from the machine.
Finishing your ornaments
A light sanding with 240 grit, or a damp cloth, removes the smoke residue. Leave the masking tape on while you paint the engraving, then peel it off for crisp edges. A coat of clear varnish or a spray finish keeps the wood from yellowing, and a red ribbon or a loop of twine through the 5 mm hole is all the hanger you need.
With the outline, the hole, the layers in the right order and a quick test on your sheet, the first ornament is a matter of minutes, and the fiftieth is no more work than the first. Download Bernie for free and cut your own.
What is the best wood for laser cut Christmas ornaments?
Laser-grade birch or poplar plywood in 3 mm is the most common choice: it is cheap, light, engraves a clear mark and cuts cleanly. Basswood is lighter in color and takes fine detail. Avoid cheap plywood with voids or heavy glue lines, which stop the cut.
Can a diode laser cut Christmas ornaments?
Yes. A 5 W diode cuts 3 mm plywood slowly in about three passes, a 10 W diode in about two, a 20 W diode often in one. A diode cannot cut clear acrylic, though: for clear acrylic ornaments you need a CO2 laser.
How big should a laser cut ornament be?
Most wooden ornaments are 60 to 90 mm across, about 2.5 to 3.5 inches. In 3 mm plywood, 80 mm is a good balance between room for a name and weight on the branch.
How do I personalize ornaments with different names?
Put the name in a variable text that reads a CSV file, one name per row, and make a grid of ornaments that steps to the next row on each copy. In Bernie this is CSV Merge with Variable Text: Step per Copy in the Array window.
Should I engrave or cut first?
Engrave first and cut last. Once the outline is cut, the piece can move or drop slightly, and anything engraved after that lands off center.
Is laser cutting Christmas ornaments free in Bernie?
Yes. Bernie is free, funded by donations, with no account and no subscription, and every tool in this tutorial is included.