3D laser engraving carves a relief into the surface: the laser removes more material where the design should be deep and less where it should stay high. It is driven by a depth map, a grayscale image in which black usually means deepest and white means untouched. To engrave a 3D model, you turn the STL into such a map, then engrave it with power that follows the grey (CO2 or diode) or in many thin slices (fiber galvo), over several slow passes, after a test on the same material.
Below: what 3D engraving is and is not, which laser and material to choose, how to get a depth map from an STL, a complete tutorial in free software with a 3D preview of the result, starting settings and the problems to expect.
What 3D laser engraving is (and is not)
Surface relief is often called 2.5D: the laser can only remove material from above, so each point of the surface has one depth and there are no undercuts. A depth map stores that depth as brightness. xTool, Glowforge and LightBurn all use the same convention by default: the darker a pixel, the deeper the cut.
There are two ways to turn grey into depth:
| Method | How it works | Typical use |
|---|---|---|
| Grayscale power | Power varies pixel by pixel between a minimum and a maximum, over one pass or a few | CO2 lasers on wood or acrylic; diode lasers for shallow relief |
| Sliced passes | The map is cut into depth levels and each pass engraves everything darker than its level, so dark areas receive more passes | Fiber and MOPA galvos on metal, often hundreds of passes |
Not the same as crystal engraving
The glowing 3D portraits inside glass blocks come from sub-surface engraving: a laser focused inside the crystal makes tiny fractures, leaving the surface untouched. It needs dedicated machines, usually UV lasers with special optics, and has nothing to do with relief engraving on a hobby laser.
Which laser and material for 3D engraving?
| Laser | Good materials | What to expect |
|---|---|---|
| Fiber or MOPA galvo | Stainless steel, brass, aluminium, precious metals | Deep, crisp relief in metal, built up slice by slice; slow, from minutes to hours |
| CO2 | Hardwood, MDF, acrylic, Delrin | Soft, sculpted relief in wood; Trotec recommends materials with a uniform structure all the way through |
| Diode | Light, even hardwood such as maple or birch plywood | Shallow relief; LightBurn notes that grayscale is harder to get right on a diode than dithering |
Whatever the laser, depth does not follow power in a straight line: deeper passes have to burn through the char left by earlier ones, and a deep pocket drifts out of focus. That is why every relief starts with a test on the material you will use. Our laser settings by material guide gives starting speeds and powers.
How to get a depth map from an STL
- Import the model directly. Some laser software reads 3D files and makes the map for you. Bernie does it for STL, OBJ, 3MF, PLY, OFF and AMF models; LightBurn adds an Import 3D Model command in version 2.2, still a release candidate at the end of October 2026.
- STL2PNG, a free tool from FenrusCNCtools, renders an STL as a depth map in your browser, with nothing uploaded.
- Blender: place an orthographic camera above the model and save the Mist pass, which spans 0 to 1, as a 16-bit grayscale PNG. The raw Depth (Z) pass is not anti-aliased and needs normalising first.
Save the map in 16 bits whenever you can. An 8-bit image has only 256 grey levels: on a galvo, more than 256 slices bring no extra precision, and smooth curves turn into visible steps. A 16-bit map has 65,536 levels. Keep it lossless too: PNG or TIFF, never JPEG.
How to engrave a 3D model in relief in Bernie
Bernie, the free laser software, turns a 3D model into a 16-bit depth map and engraves it, with a 3D preview of the result before the laser fires. Here, an 80 × 80 mm mountain relief in plywood on a Creality Falcon2, a diode laser.
- Choose your machine. Pick it in the catalog, so the map is placed on its bed and the right layer mode is chosen: grayscale for a gantry laser, 3D slices for a galvo. The compatible machines page lists them.
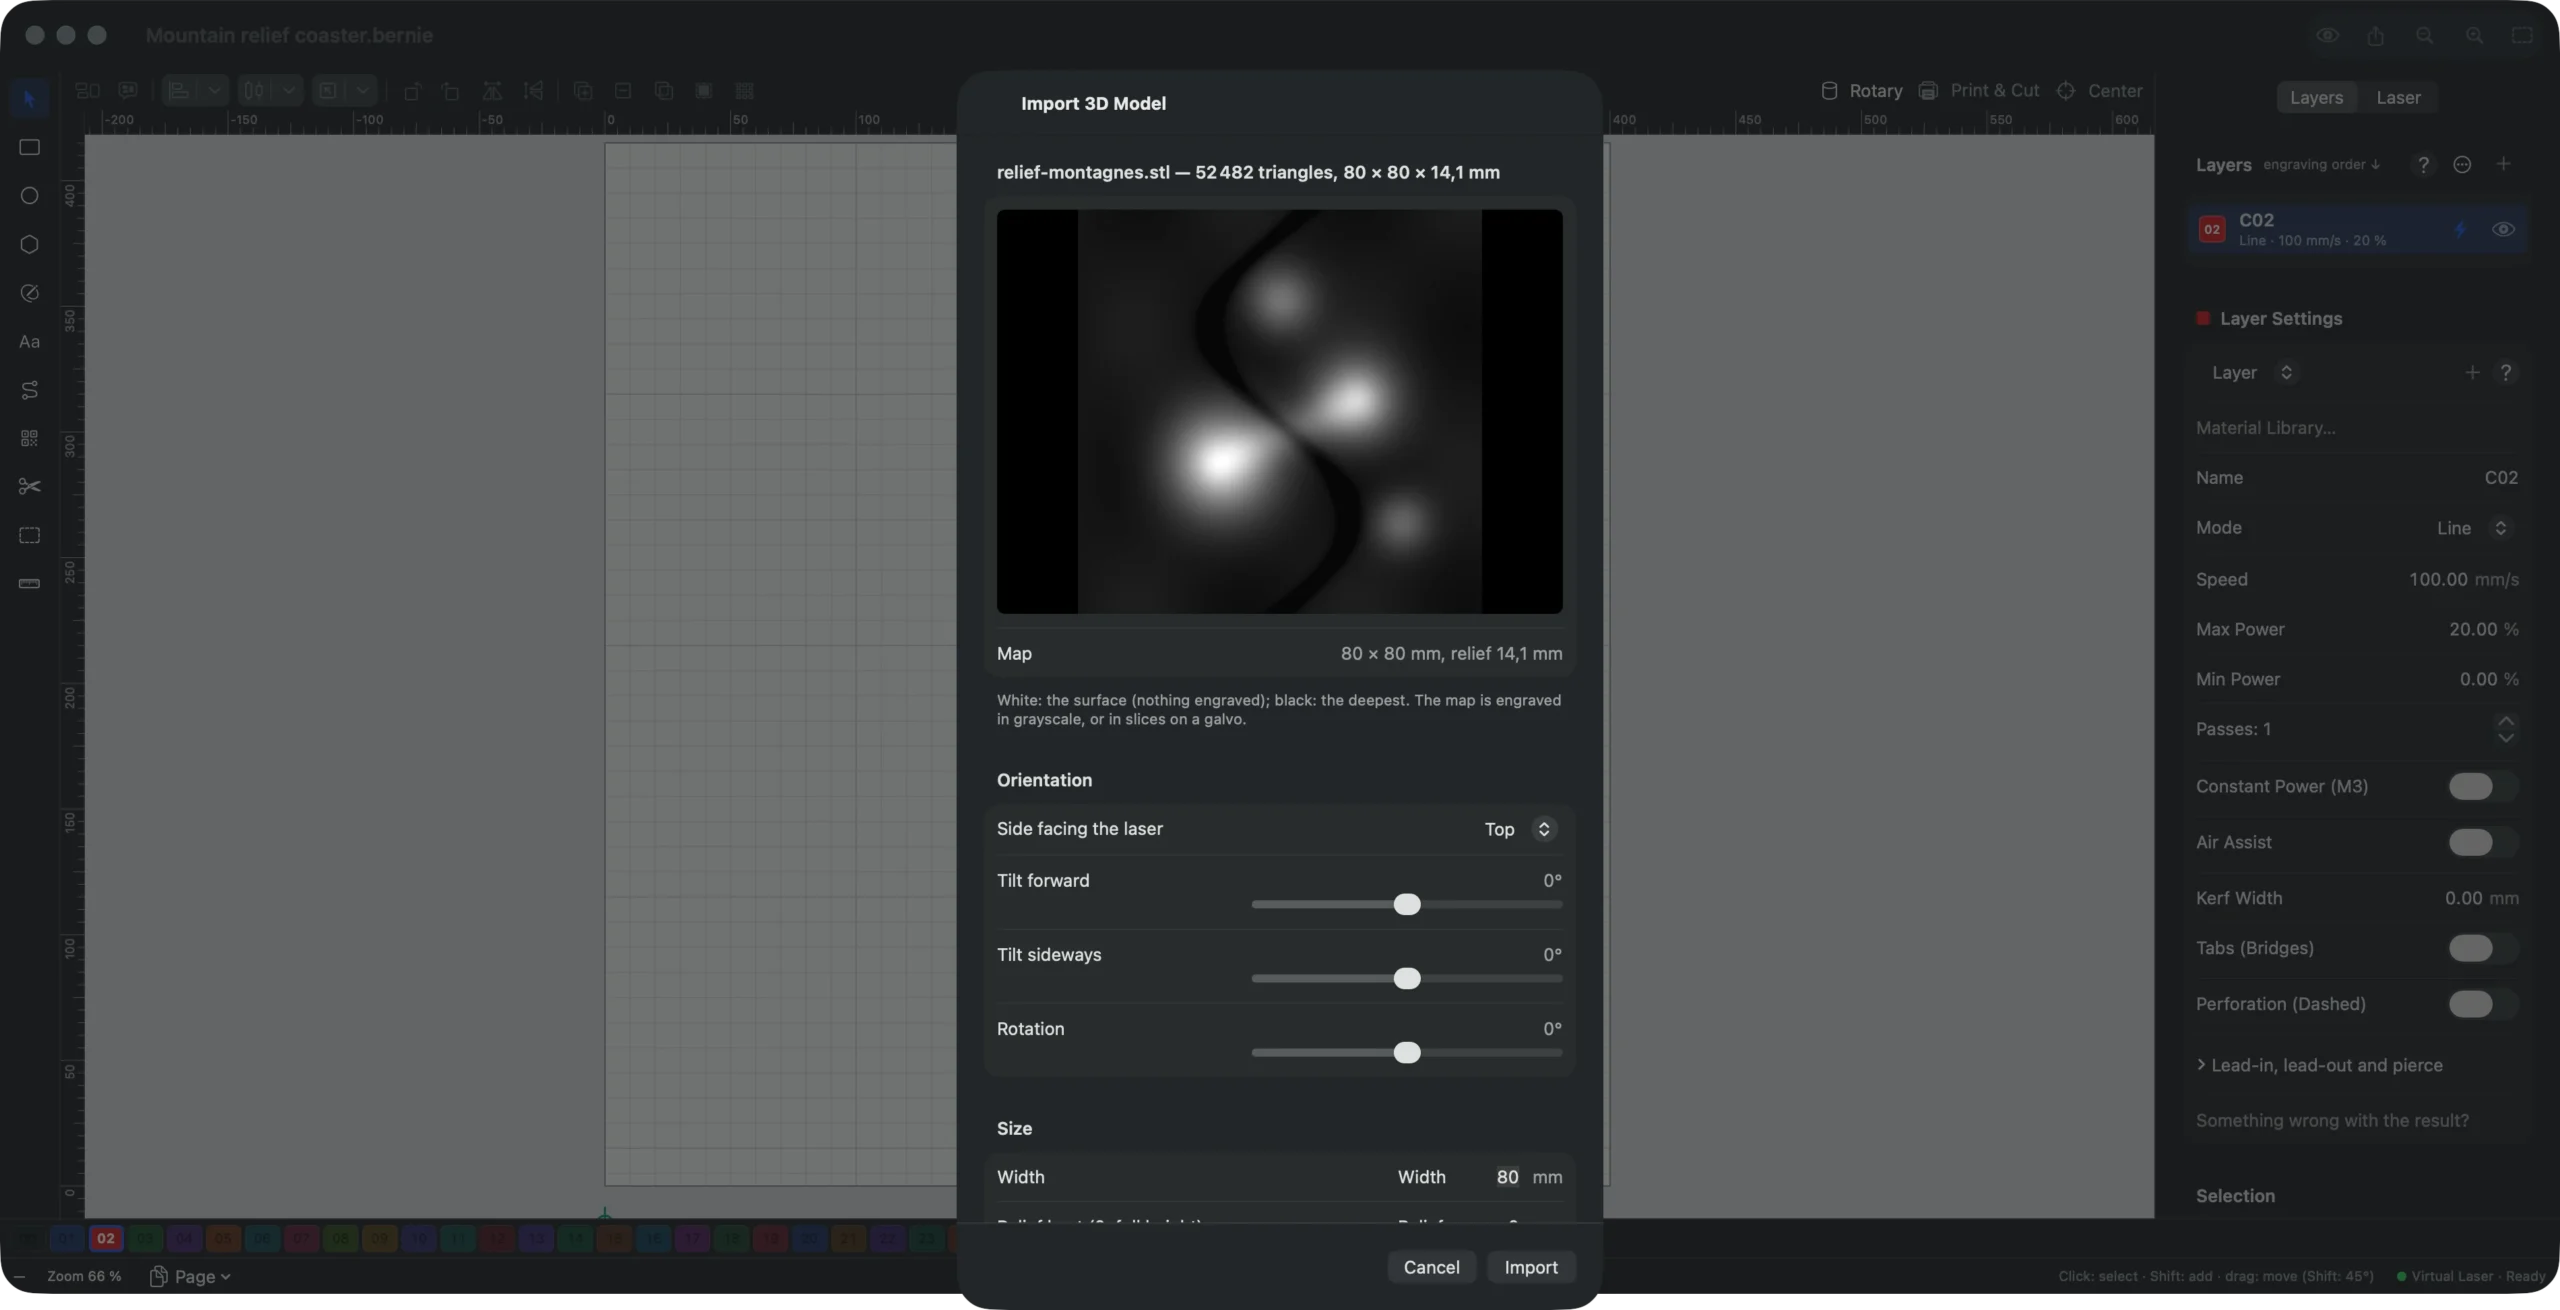
- Import the model. Choose File › Import… and pick the STL, or drag it onto the workspace. In Bernie Studio, use Import 3D Model…. The Import 3D Model window opens with a preview of the map.
- Turn it the right way. Side facing the laser is Top for most CAD exports; a model exported “Y up”, common with OBJ files, often comes out right with Front. The tilt and Rotation sliders straighten it.
- Set the size and the depth. Width sets the size, the height follows. Relief kept (0: full height) limits the depth to the top of the model, Resolution stays at 10 pixels per mm for a start, and Background chooses between a raised model, with the background engraved, and a model carved into the surface.
- Import. Click Import: the map lands in the middle of the bed on an Image layer, ready to engrave in Grayscale, where power follows depth.
- Set the layer. Give the Image layer a slow speed, a high maximum power and several passes: depth builds up pass after pass. Run a material test on an offcut first and note the setting that gives the depth you want.
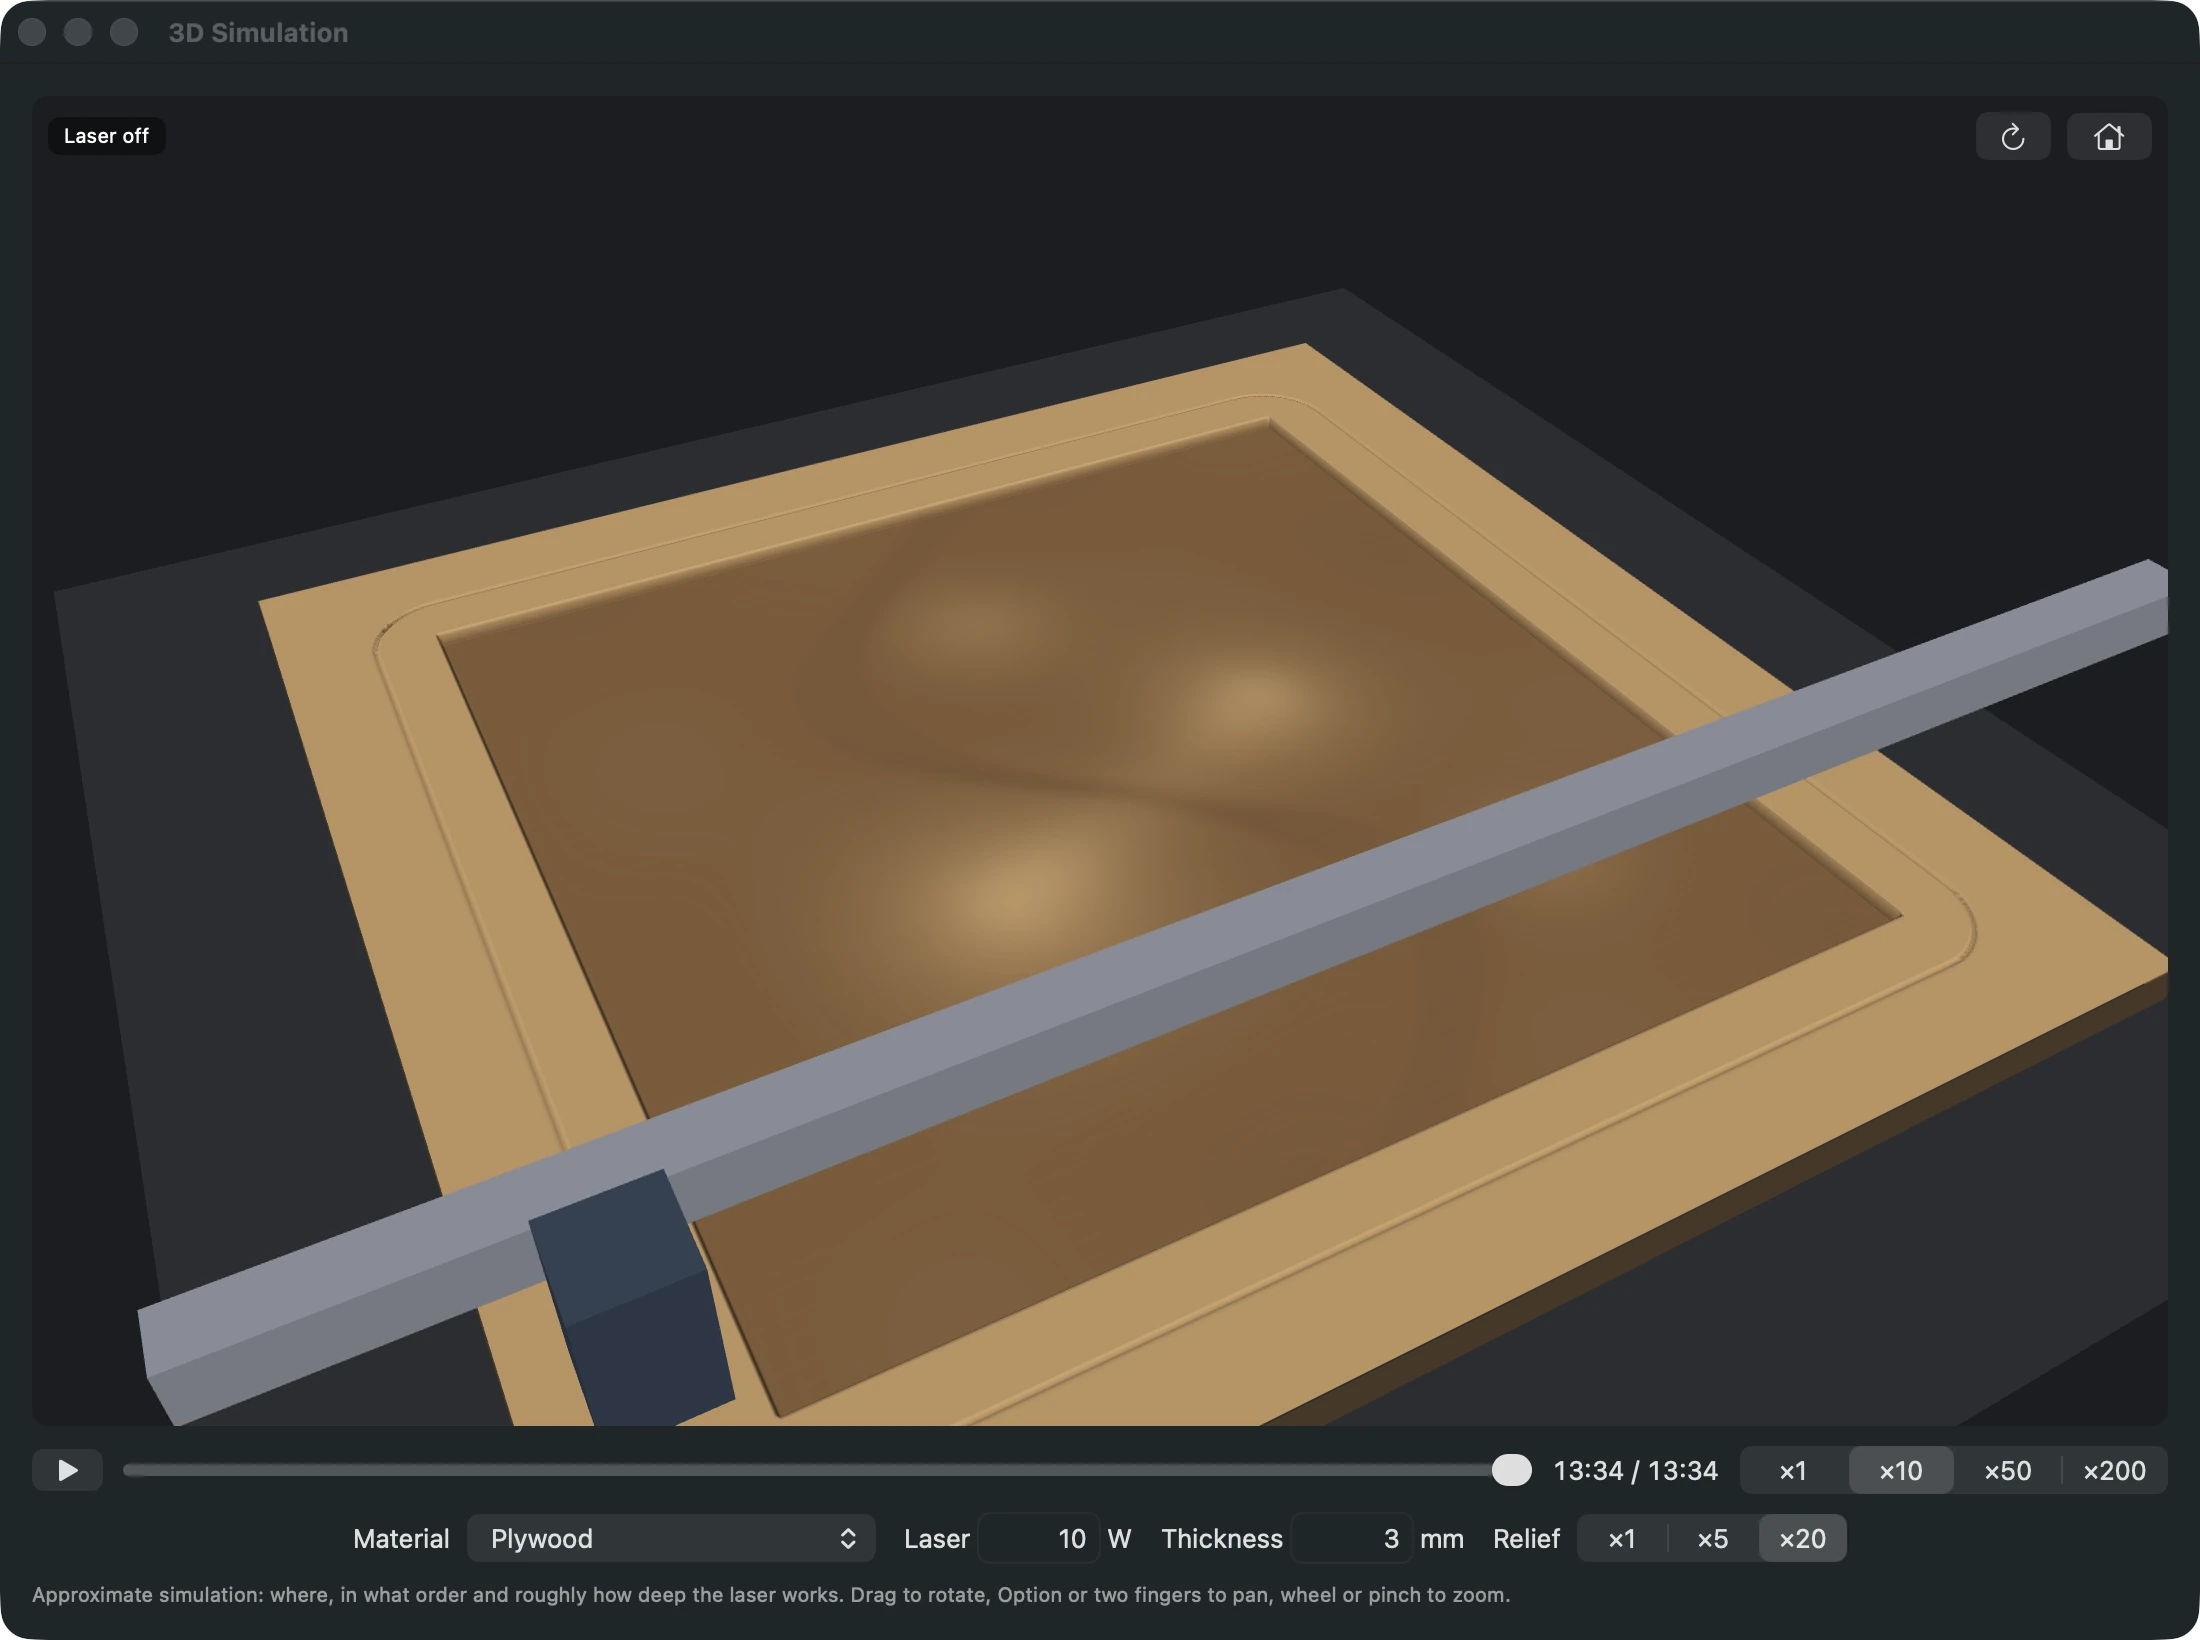
- Check it in 3D. Open Laser › 3D Simulation… on Mac, or View › 3D Simulation… in Bernie Studio and the desktop app. The workpiece is carved and darkened as the job plays; Relief ×5 or ×20 exaggerates a shallow engraving so you can see it. It is an approximation, not a prediction: the material test stays the reference.
- Frame and engrave. Frame to check the position, start the job and stay with the machine. Brush the char off between passes if it builds up.
On a fiber galvo, the same map is engraved in 3D Sliced mode, with as many slices as passes, and Slices Between Cleanups adds a cleaning pass every few slices. The manual’s 3D models and 3D simulation sections detail every setting, and the galvo and fiber page covers marking on metal.
Engrave your first relief for free
Import your own STL and preview it in 3D: Bernie is free, with no account and no subscription, on the Mac, on Linux and in your browser with Bernie Studio, Windows included.
Starting settings for 3D engraving
There is no universal setting: depth depends on the material, the focus and the machine. These published examples are good places to start your test:
- CO2 on wood (Trotec, 80 W Speedy 360): three or four passes at full power and 30 % speed, then one or two cleaning passes at 60 % power and full speed to lift the soot.
- CO2 on cherry (Thunder Laser example): 300 mm/s, grayscale between 2 and 99 % power, 350 DPI, three passes.
- Fiber galvo on metal: hundreds of slices, a cleaning pass every few dozen, and the focus lowered as the pocket deepens, as xTool and Sculpfun recommend for their machines.
For a photo-like shading rather than a real relief, a dithered image is easier, especially on a diode: our guide to engraving a photo covers it.
Common problems
Steps or bands across smooth slopes
The map is probably 8-bit, or saved as JPEG. Export it again in 16 bits, as PNG or TIFF. In Bernie, the Image section shows the Color Depth of the selected image.
The relief is too shallow, or burnt
Shallow: slow down or add passes before raising the power. Burnt and black on wood: add cleaning passes, use air assist and clean the surface afterwards; Trotec suggests a toothbrush with a little soapy water, then drying.
The model comes out upside down or on its side
Change Side facing the laser: CAD software usually exports “Z up” (Top), 3D modelling software often “Y up” (Front). The preview in the import window shows the result before you place it.
Only the top of the model has any shading
A tall model with fine detail on top spends most of its grey range on height. Lower Relief kept to keep only the top few millimetres: the shading spreads over the detail you care about.
Safety on long relief jobs
Relief jobs run for a long time at high power, on materials that can catch fire. Never leave the laser unattended, keep air assist on, ventilate, and never engrave PVC, vinyl or ABS, which release toxic fumes. Clean the bed after the job: a build-up of debris is itself a fire risk, and our laser maintenance schedule says how often to clean the optics after long jobs.
Frequently asked questions
Can a diode laser do 3D engraving?
Yes, within limits. A diode can engrave a shallow relief in light, even wood using a grayscale depth map and several passes. For deep relief, a CO2 laser on wood or a fiber galvo on metal does much better.
What is a depth map?
A grayscale image in which brightness stands for depth: usually black is the deepest point and white is the untouched surface. Laser software turns the grey into power or into a number of passes. Save it in 16 bits for smooth slopes.
Can I laser engrave an STL file directly?
Only with software that converts it into a depth map. Bernie imports STL, OBJ, 3MF, PLY, OFF and AMF models directly; otherwise, make the map with a tool such as STL2PNG or Blender and import the image.
How deep can a laser engrave in 3D?
It depends on the laser, the material and the time you give it. Manufacturers rarely quote figures: industrial fiber lasers can reach a few millimetres in metal over many passes. Run a test on your own material to know your depth per pass.
Is 3D laser engraving the same as crystal engraving?
No. Relief engraving removes material from the surface. Crystal engraving focuses a laser inside clear glass to create tiny fractures that form an image, which takes dedicated machines.
A good relief starts with a good map and a material test. Bernie handles the map and shows you the result in 3D before you burn anything: download Bernie and import your first model.