When a laser is not cutting through, the beam is not delivering enough energy to the bottom of the material. Nine times out of ten the cause is one of these: the speed is too high or the passes too few for the thickness, the focus is wrong, the lens is dirty, there is no air assist, or the board itself (glue layers, moisture, warping) resists. Check them in that order, then run a cut test that varies power and passes on a scrap of the same board: the first square that drops out gives your setting.
Below: what a diode or CO2 laser can realistically cut, the nine causes with their fixes, a complete step-by-step in free software, and the problems specific to plywood, MDF and acrylic.
Can your laser cut it at all?
Before changing any setting, make sure the job is within what the machine can do. Laser power is quoted two ways: optical power (what actually comes out of the lens) and electrical power (what the module draws), which can be four or five times higher. A “40 W” diode module is often a 10 W optical laser. Cutting depends on optical power.
Bernie’s starter material libraries give cautious starting points for cuts, always with air assist. They show the order of magnitude to expect, before you fine-tune on your own machine:
| Laser (optical power) | Poplar plywood 3 mm | Poplar plywood 5 mm | MDF 3 mm |
|---|---|---|---|
| Diode 5 W | 3 mm/s, 100 %, 3 passes | — | 2.5 mm/s, 100 %, 4 passes |
| Diode 10 W | 6 mm/s, 100 %, 2 passes | 3 mm/s, 100 %, 3 passes | 5 mm/s, 100 %, 2 passes |
| Diode 20 W | 10 mm/s, 100 %, 1 pass | 5 mm/s, 100 %, 2 passes | 8 mm/s, 100 %, 1 pass |
| CO2 40 to 60 W | 15 mm/s, 65 %, 1 pass | 6 mm: 8 mm/s, 80 %, 1 pass | 15 mm/s, 70 %, 1 pass |
Two consequences. A 5 W diode cuts 3 mm plywood only slowly and in several passes; 6 mm is a struggle. And a diode laser cannot cut clear or blue acrylic at all: its blue light goes straight through. Black or dark opaque acrylic is possible with a diode; clear acrylic needs a CO2 laser.
9 reasons your laser is not cutting through
1. Too fast, or not enough passes
Cutting is energy per millimetre: halve the speed and you roughly double the energy each point receives. If the cut stops half way, slow down or add passes. Several faster passes usually give a cleaner edge than one very slow pass, which chars the wood and widens the kerf, but they take longer. Do not change the setting by guesswork: a cut test (below) finds it in one go.
2. Power not really at 100 %
On GRBL controllers, the power you set in the software is scaled against a maximum value, the controller’s $30 setting, usually 1000. If the software’s maximum (S max) is higher than $30, every power is clipped; if it is lower, 100 % in the software is only a fraction of the laser. A mismatch here explains a laser that “used to cut” after a firmware update or a change of software.
3. Wrong focus
The beam is narrowest, and its energy most concentrated, at the focal point. A head a few millimetres too high or too low spreads the energy and the cut stops short. Set the focus with your machine’s gauge or a focus test, on the actual board. For thick material, many users focus slightly into it rather than on the surface, or lower the head after each pass on machines with a motorized Z axis.
4. Dirty lens or mirrors
Smoke and resin settle on the lens. A thin brown film absorbs part of the beam, and the loss grows every job until the laser stops cutting. Clean the lens (and on a CO2, the mirrors) with the manufacturer’s recommended method, laser off and cooled down. A pitted or cracked lens must be replaced. Our laser engraver maintenance schedule says how often to clean, by hours of use.
5. No air assist
Air assist blows a jet of air into the cut. It clears the smoke that would otherwise absorb the beam, keeps flames down and protects the lens. On wood, turning on air assist often makes the difference between a cut that stops at half depth and one that drops out.
6. The plywood itself
Plywood is layers of wood held by glue. Construction plywood often contains hard glue, filler or hidden voids, and a single dense glue line stops the cut in one spot while the rest goes through. Laser-grade plywood (poplar, birch, basswood) uses glue that cuts cleanly. Damp wood also takes more energy: store boards flat and dry.
7. Warped board or uneven bed
If the board bows, the distance to the lens changes across the bed and the focus with it: the job cuts in one corner and not in another. Hold the board flat with weights, magnets or pins outside the cut area, and check that the bed is level.
8. Nothing under the cut
A board lying directly on a solid surface traps smoke and heat at the bottom of the cut, and the beam reflects back into the wood. A honeycomb bed or a few spacers lift the board so the cut can vent underneath.
9. A tired laser
When everything above is right and the cuts keep getting shallower, the source may be ageing. CO2 tubes lose power over their life; a diode module that has overheated may never return to full power. Compare a cut test with the one you ran when the machine was new: that is why it pays to keep them.
Safety first
Cutting means fire: never leave the laser running unattended, keep a fire extinguisher at hand and extract the smoke outside or through a filter. Wear goggles rated for your laser’s wavelength. Never cut PVC or vinyl: they release chlorine, which is toxic and corrodes the machine.
How to fix a laser not cutting through in Bernie
Bernie is free laser software, funded by donations. It has a guided diagnosis and a cut test built in, and its layers and material library keep the result for next time. Here is the whole process on a 90 mm coaster in 5 mm poplar plywood, with an engraved name and a cut outline.
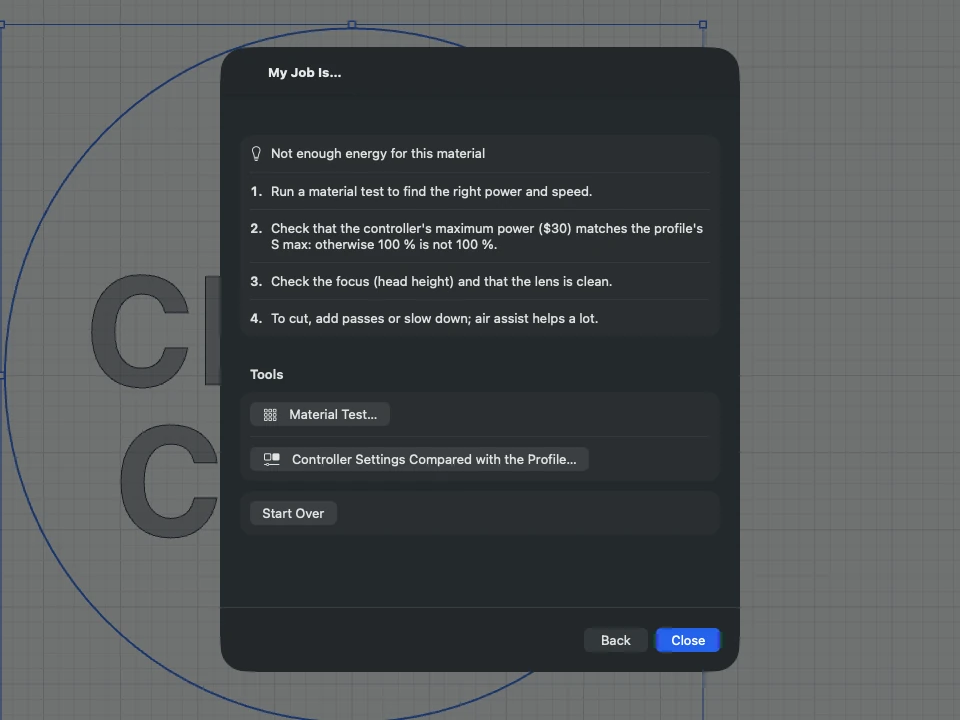
- Ask Bernie. Choose Help › My Job Is… (or click Disappointing result? My Job Is… in the Laser panel), then Too faint, or does not cut. If the whole job is too shallow, answer The whole engraving: Bernie shows Not enough energy for this material, with the checks to make. If only some areas fail, answer Only some areas: the distance between the head and the board varies, so flatten the board first.
- Check the controller. With a GRBL laser connected, click Controller Settings Compared with the Profile… in the same window: Bernie lists where the controller differs from the device profile, such as the maximum power (
$30against the profile’s S max). Align the Profile with the Machine fixes the profile in one click. - Start from a known setting. Open Laser › Material Library…, then Manage › Add a Starter Library and pick the one for your laser, for instance Starter — diode 10 W. Select Poplar plywood 5 mm, Cutting, and click Apply to Layer with the cut layer active.
- Check the cut layer. Click the layer in the Layers list: its mode is Line, here at a Speed of 3 mm/s, a Max Power of 100 % and 3 Passes, with Air Assist ticked. Keep the engraving on its own layer above it, so the coaster is engraved before it is cut free.
- Run a cut test. Choose Laser › Material Test… and, under Preset, pick Cut: Power × Passes: a grid in Line mode, power from 60 to 100 % down the rows and 1 to 5 passes across the columns, at 5 mm/s. Change the Speed under Fixed Settings if your laser is much stronger or weaker, place the test on a scrap of the same board, click Frame, then Start….
- Keep the winning cell. Find the lowest-energy square that dropped out cleanly, then use Keep a Cell: pick that cell and the material, and its settings go into the material library, ready to apply to the cut layer.
- Help thick material through. In the layer’s Lead-in, lead-out and pierce section, a short Pierce time holds the laser on at the start of each cut before it moves. With a motorized Z axis, the layer also offers a Z Offset and, from two passes, a Z Step per Pass that lowers the head as the cut deepens.
- Cut in the right order. Open Laser › Cut Order Optimization… and check that Cut inner shapes first is on, so the hole is cut before the coaster drops and shifts. Then turn on the preview to check the paths and the time, click Frame, and Start. Stay with the machine.
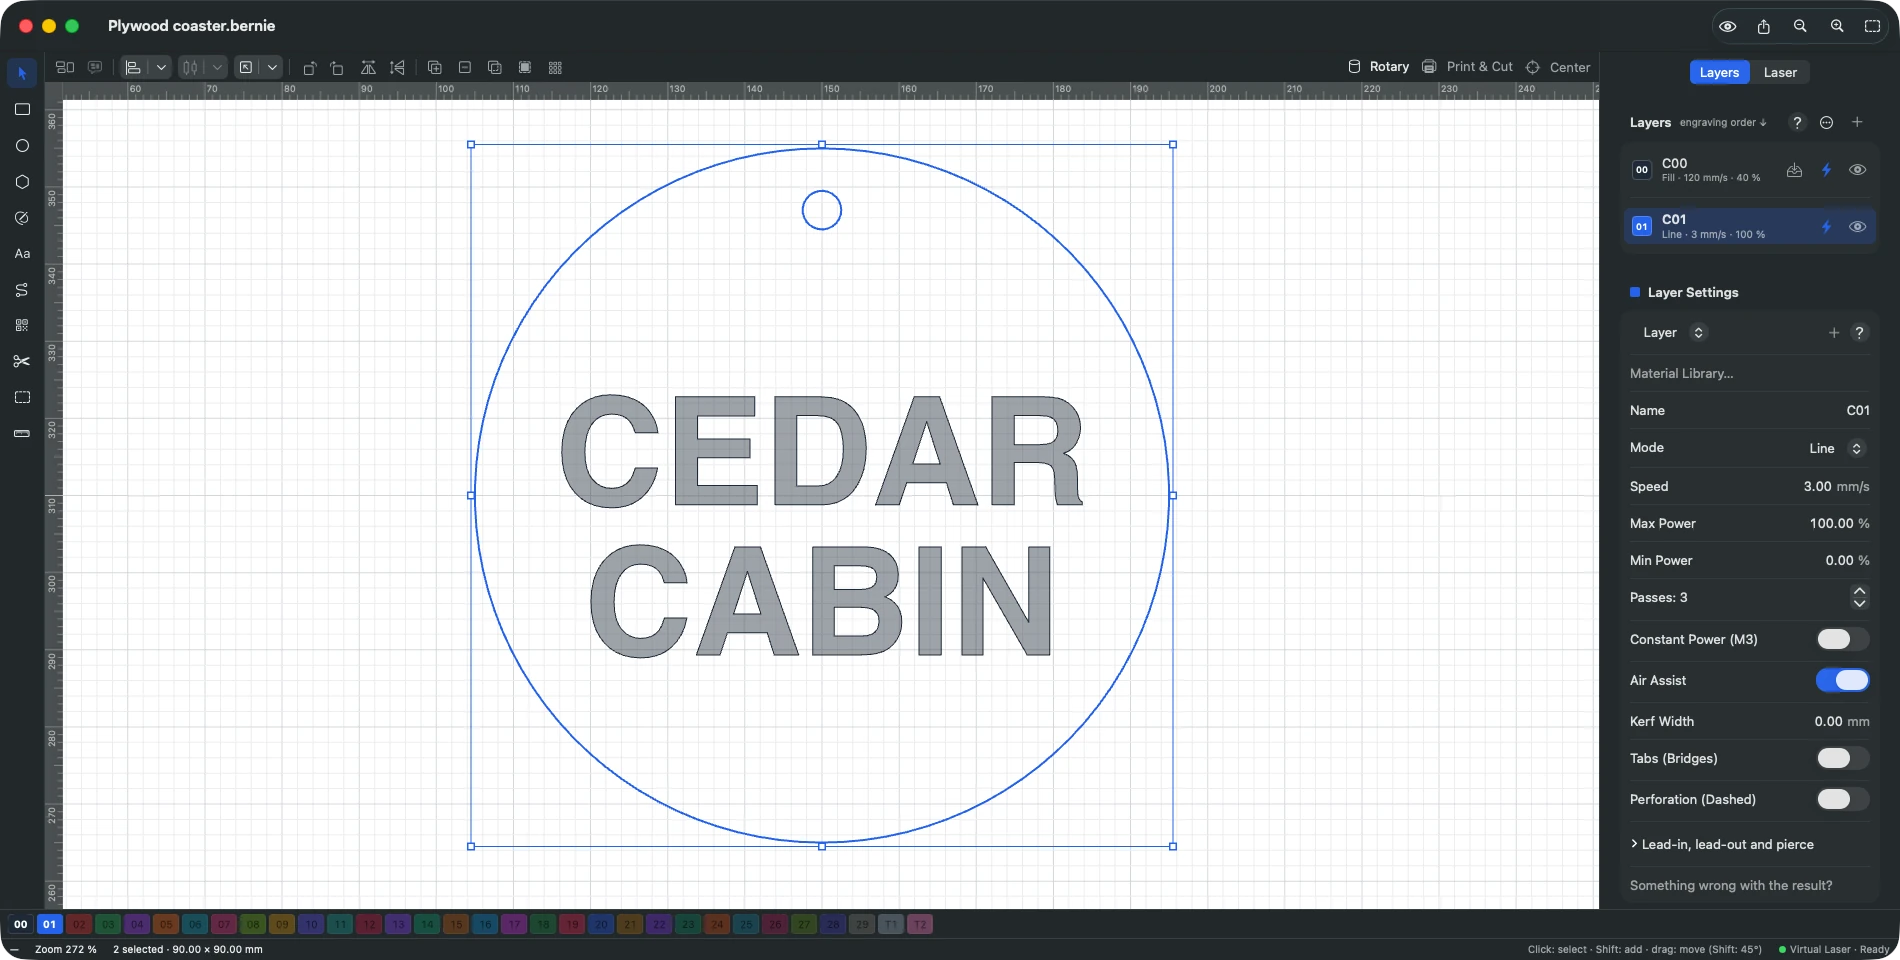
If the test shows that even the slowest, strongest square does not go through, stop adding passes: go back to the focus, the lens and the board. Bernie’s My Job Is… window keeps those checks in front of you, with buttons that open the right tools.
Run your cut test for free
Repeat these steps on your own machine: Bernie is free, with no account and no subscription. It runs on Mac, Windows, Linux, iPad and in your browser with Bernie Studio, and the iPhone app is its pocket companion.
Plywood, MDF and acrylic: what changes
| Material | Typical problem | What helps |
|---|---|---|
| Plywood | Cut stops in spots: a glue line, a knot or a void | Laser-grade poplar or birch; one more pass; air assist |
| MDF | Slow, heavy smoke, brown edges | Air assist, several passes, strong extraction |
| Clear or blue acrylic | Diode laser does nothing | A CO2 laser; or opaque dark acrylic |
| Cast or extruded acrylic (CO2) | Melted, re-welded bottom edge | Raise the board; less air on acrylic for a polished edge |
| Cardboard and paper | Burns or catches fire | Faster, lower power, air assist, never unattended |
| Leather | Charred, smelly edge | Vegetable-tanned only, several light passes |
Our guide to laser engraving settings by material covers the engraving side of the same materials, and if you are deciding between a diode and a CO2 for cutting, see diode, CO2, fiber or galvo.
When the cut goes through but the parts do not fit
Once the laser cuts through, the next surprise is often size: the beam removes a strip of material, the kerf, so slots come out too wide and tabs too narrow. Bernie’s Laser › Calibration Patterns › Kerf Test… cuts a plate with 11 slots and a tab; the slot where the tab is a snug fit gives the value for the layer’s Kerf Width. Tabs, lead-ins and the other cutting options are on the layers page, and the compatible machines page lists the lasers Bernie drives over USB and the network, as described in connection and control.
Frequently asked questions
Why is my laser not cutting all the way through?
The beam is not delivering enough energy to the bottom of the material. Slow down or add passes, check that 100 % in the software really is the controller’s full power, refocus, clean the lens and turn on air assist. If only some spots fail, the board is warped or has glue lines or voids.
How many passes does it take to cut 3 mm plywood?
It depends on the laser. As a starting point, a 10 W optical diode cuts 3 mm poplar plywood in about two passes at 6 mm/s, a 20 W diode in one pass at 10 mm/s, and a 40 to 60 W CO2 in one pass at 15 mm/s. Confirm with a cut test on your own board.
Is it better to cut slowly or with more passes?
Several faster passes usually give cleaner, less charred edges and a narrower kerf than one very slow pass, at the cost of time. With air assist, both work; a cut test that varies power and passes shows which is best on your machine.
Can a diode laser cut acrylic?
Only dark, opaque acrylic. A diode laser’s blue light passes straight through clear and blue acrylic without cutting it. Clear acrylic needs a CO2 laser.
Why does my laser cut one side but not the other?
The distance between the lens and the board changes across the bed: the board is warped or the bed is not level. Hold the board flat with weights or pins outside the cut, and level the bed.
Does a dirty lens stop a laser from cutting?
Yes. A film of smoke residue absorbs part of the beam and the loss grows with every job. Clean the lens as the manufacturer recommends; replace it if it is pitted or cracked.
A laser that does not cut through is rarely broken: energy, focus, lens, air and material explain almost every case, and a cut test turns guesswork into a setting you can keep. Try it with Bernie, free on Mac, Windows, Linux and in the browser, and if it saves you a sheet of plywood, consider supporting its development.