To laser mark stainless steel, use a fiber laser, usually a galvo machine: its 1064 nm beam is absorbed by bare metal, which a diode or CO2 beam mostly bounces off. You choose the kind of mark with the settings: slow and fine for a black annealed mark that stays smooth to the touch, fast for a light etched mark, many passes at high power for a deep engraving. There is no universal recipe, because the source, the lens and the grade of steel all change the result, so the reliable way is a small test card on an offcut of the same steel.
Below: which laser you need, the three kinds of marks and what drives each one, starting points for the settings, and a complete tutorial in free software on a 70 × 40 mm stainless tag with a QR code and a serial number, from the design to the marking.
Which laser can mark stainless steel?
| Laser | On bare stainless steel | What to expect |
|---|---|---|
| Fiber (Q-switched) | Yes | Black, grey or light marks, deep engraving with many passes |
| Fiber MOPA | Yes | The same, plus adjustable pulse width: deeper blacks, some colors |
| UV galvo | Yes, lightly | Fine, shallow marks; slower on metal |
| Diode (5–40 W) | Not directly | With a marking spray or paste, a dark bonded layer |
| CO2 | Not directly | With a marking spray, like a diode |
A diode or CO2 laser can still label stainless steel with a metal marking spray or paste: the beam fuses the coating onto the surface, and the excess washes off. It works, but it is a coating, not a change in the steel itself. If you are still choosing a machine, our comparison of diode, CO2, fiber and galvo lasers explains the differences.
Three kinds of marks on stainless steel
Black annealing
The beam heats the surface without removing it, and a thin oxide layer grows: the mark is black or dark grey, flat, and the surface stays smooth. It is the classic mark for tools, medical and food equipment, where a rough groove would trap dirt. It needs heat more than power: slow speed, a very fine line interval, a high frequency, and often the lens focused slightly above or below the surface.
Light etching
At higher speed the beam removes a thin film and leaves a light grey or frosted mark. It is fast and readable on a polished or brushed finish, good for serial numbers and logos on parts in series.
Deep engraving
High power, a lower frequency and many passes ablate the metal layer by layer, for a groove you can feel: knife blades, stamps, molds. Turning the hatch angle on every pass keeps the bottom flat, and a light cleaning pass at the end brightens it.
Annealing or engraving?
Annealing changes the color of the surface; engraving removes metal. Ablation removes the protective film that makes stainless steel stainless, so a deep mark on a part that lives outdoors or in water is worth cleaning, and passivating if it matters.
The settings that matter
On a galvo, the mirrors move the beam at hundreds or thousands of millimetres per second, and the pulses of the source add settings a diode laser does not have. These are the ones to understand before you test.
- Speed (mm/s): the main heat control. Slower is darker for annealing, but too slow and the steel turns brown, blue or gold around the mark.
- Power (%): the energy of each pulse. Annealing rarely needs full power; engraving does.
- Frequency (kHz): pulses per second. Higher frequency means smaller, overlapping pulses and more heat (darker marks); lower frequency means stronger pulses that remove metal (engraving).
- Pulse width (ns, MOPA only): short pulses for a clean, fine mark; longer ones put more heat into the surface.
- Line interval (mm): the gap between fill lines. 0.01 to 0.03 mm for a solid black; wider intervals leave visible lines.
- Cross-hatch and angle: a second fill at 90° evens out the mark; turning the angle at each pass helps deep engraving.
- Passes: two passes at moderate power often give a richer black than one at high power.
- Focus: in focus for etching and engraving; a few millimetres off for a softer, more even annealing.
Starting points
These ranges are common starting points for a 20 to 60 W fiber source and a 110 × 110 mm lens, taken from manufacturers’ examples and user reports. Treat them as the center of your test card, not as an answer: the same numbers give different marks on another source or another grade of steel.
| Mark | Speed | Power | Frequency | Line interval | Passes |
|---|---|---|---|---|---|
| Black annealing | 100–400 mm/s | 20–60 % | 100–500 kHz (MOPA), or the top of the range | 0.01–0.03 mm | 1–3 |
| Light etching | 800–2,000 mm/s | 40–80 % | 30–60 kHz | 0.03–0.05 mm | 1 |
| Deep engraving | 300–1,000 mm/s | 80–100 % | 20–40 kHz | 0.02–0.05 mm | 10–50 |
For other metals and for diode and CO2 materials, our guide to laser engraving settings by material gives the principles and a test method that work on every machine.
How to laser mark stainless steel in Bernie
Bernie is free laser engraving and cutting software, funded by donations. It has a full galvo and fiber mode: the lens field becomes the workspace, layers get a frequency and a pulse width, and a virtual galvo computes the marking before a single shot. Here is the whole job on a 70 × 40 mm stainless tag with a QR code and a serial number.
- Set up the galvo. Open Settings › Devices, click New and choose Fiber galvo 110 × 110 mm, or turn on the Galvo Laser box of your profile: the workspace becomes the field of the lens. Set the source (fiber or MOPA) and the frequency range allowed by your source; if you used EZCad, Import an EZCad Configuration (markcfg, Motors.ini)… brings in the field, the mirrors and the lens corrections.
- Draw the tag. With the Rectangle tool (R), draw the plate, set its size to 70 × 40 mm in the inspector and give it a Corner Radius of 4 mm. Put it on a Line layer if you want a marked border, or on tool layer T1 (a long press on + next to Layers) as a guide that is never marked.
- Add the QR code and the serial number. Click the QR button in the left bar (⇧⌘K), type the address or the text to encode and size the code to about 24 mm. Then add a text with the Text tool (T) and choose Serial Number in its Variable Text list:
SN 0ddddmarks SN 0042, then SN 0043 on the next tag. Variable Text… sets the counter. - Set the marking layer. Put the code and the text on a layer in Fill mode. Set the Line Interval (0.02 mm for a solid black), turn on Cross-Hatch, then the Speed, Power, Frequency and, on a MOPA, Pulse Width. The material library can start you off: Manage › Add a Starter Library includes 80 W MOPA and Gweike G2 Max 50 W fiber settings, frequency and pulse width included.
- Make a test card first. On an offcut of the same steel, draw five 8 mm squares in a row and move each one to a new layer (right-click a swatch of the color strip, then move the selection to a new layer). Keep every setting the same and change one value from square to square, for example the frequency or the speed. Add a small text on each layer with the code
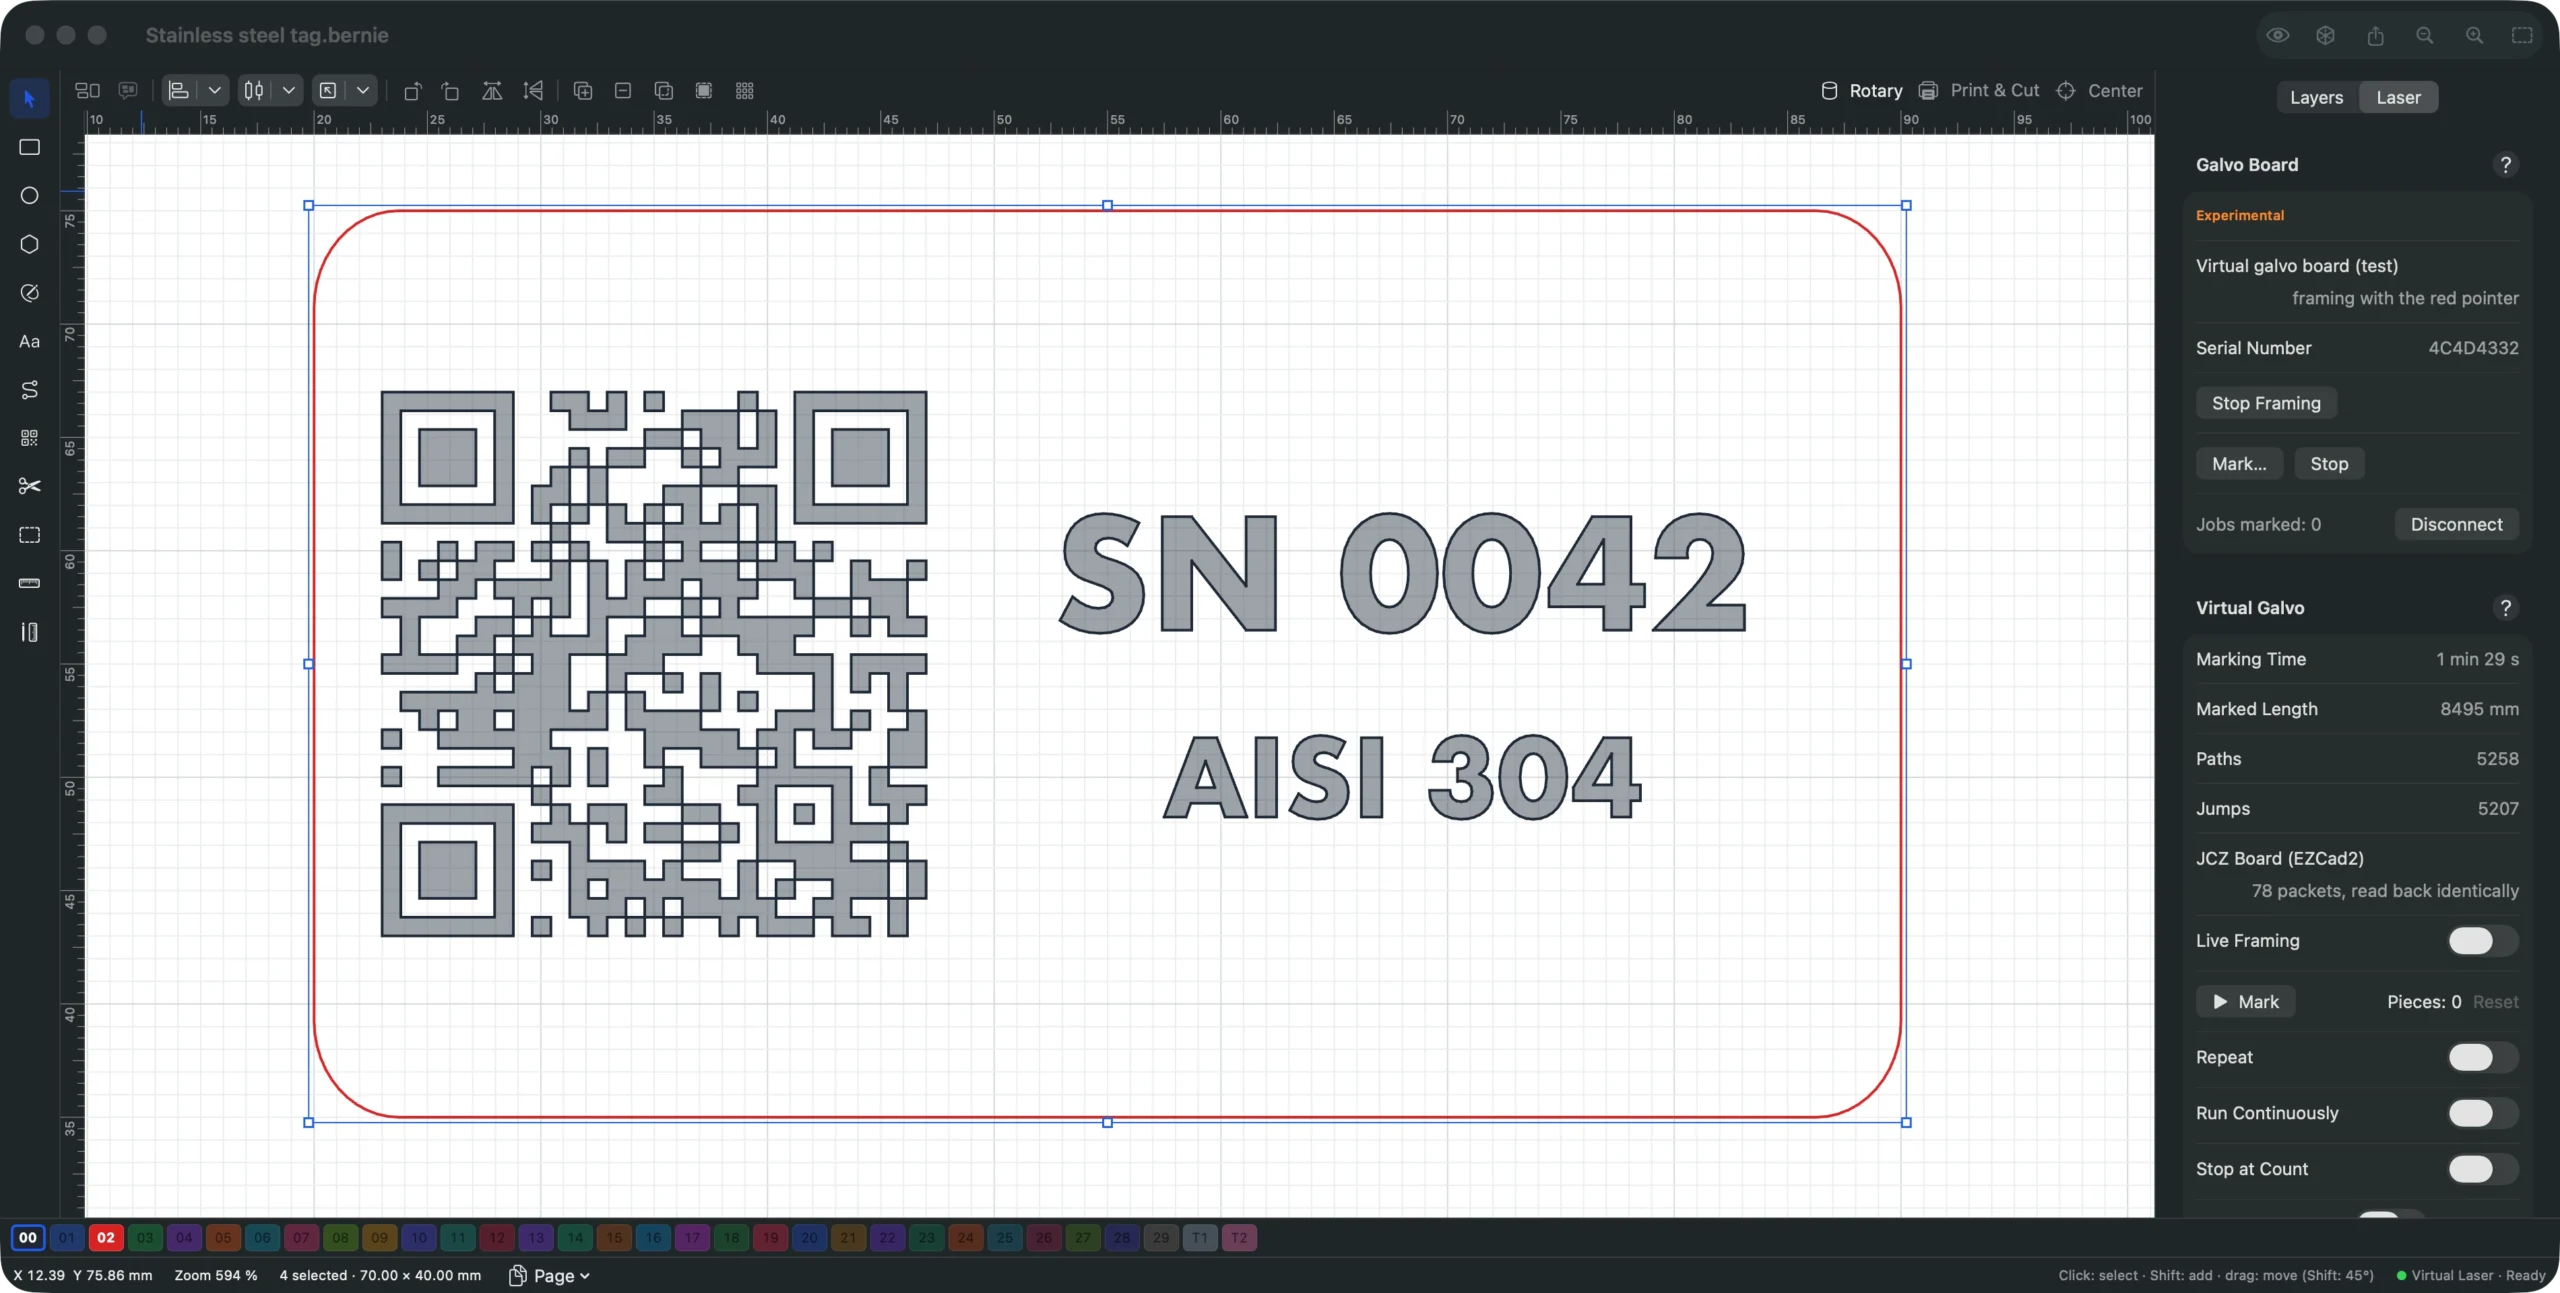
{speed}or{power}from the Cut Settings variable text, so the card labels itself. Keep the darkest even square and save it in the material library. - Check the virtual galvo. Open the Laser panel: the virtual galvo gives the marking time, the length actually marked and the jumps, flags any point outside the field and any layer whose frequency is outside your source’s range, and draws the red framing path.
- Connect the board. With an EZCad2 JCZ “LMC” board, close EZCad, plug in the board and click Connect to the Board… in the Galvo Board section. On Windows the board needs the WinUSB driver (Zadig) instead of the EZCad one. If you prefer to keep EZCad, Export for EZCad (.ezd, Experimental)… writes the project for it.
- Frame, focus and mark. Click Frame (Red Pointer): the red frame loops with the laser locked out and follows the design while you move it with the arrow keys, so you can line it up with the tag. Set the focus height, close the enclosure, put on your goggles, then click Mark… and confirm the safety question. Stop cuts the laser at once.
- Mark a series. In Variable Text…, set the counter to advance after each output: place the next blank under the red frame, mark it, and each tag gets the next number.
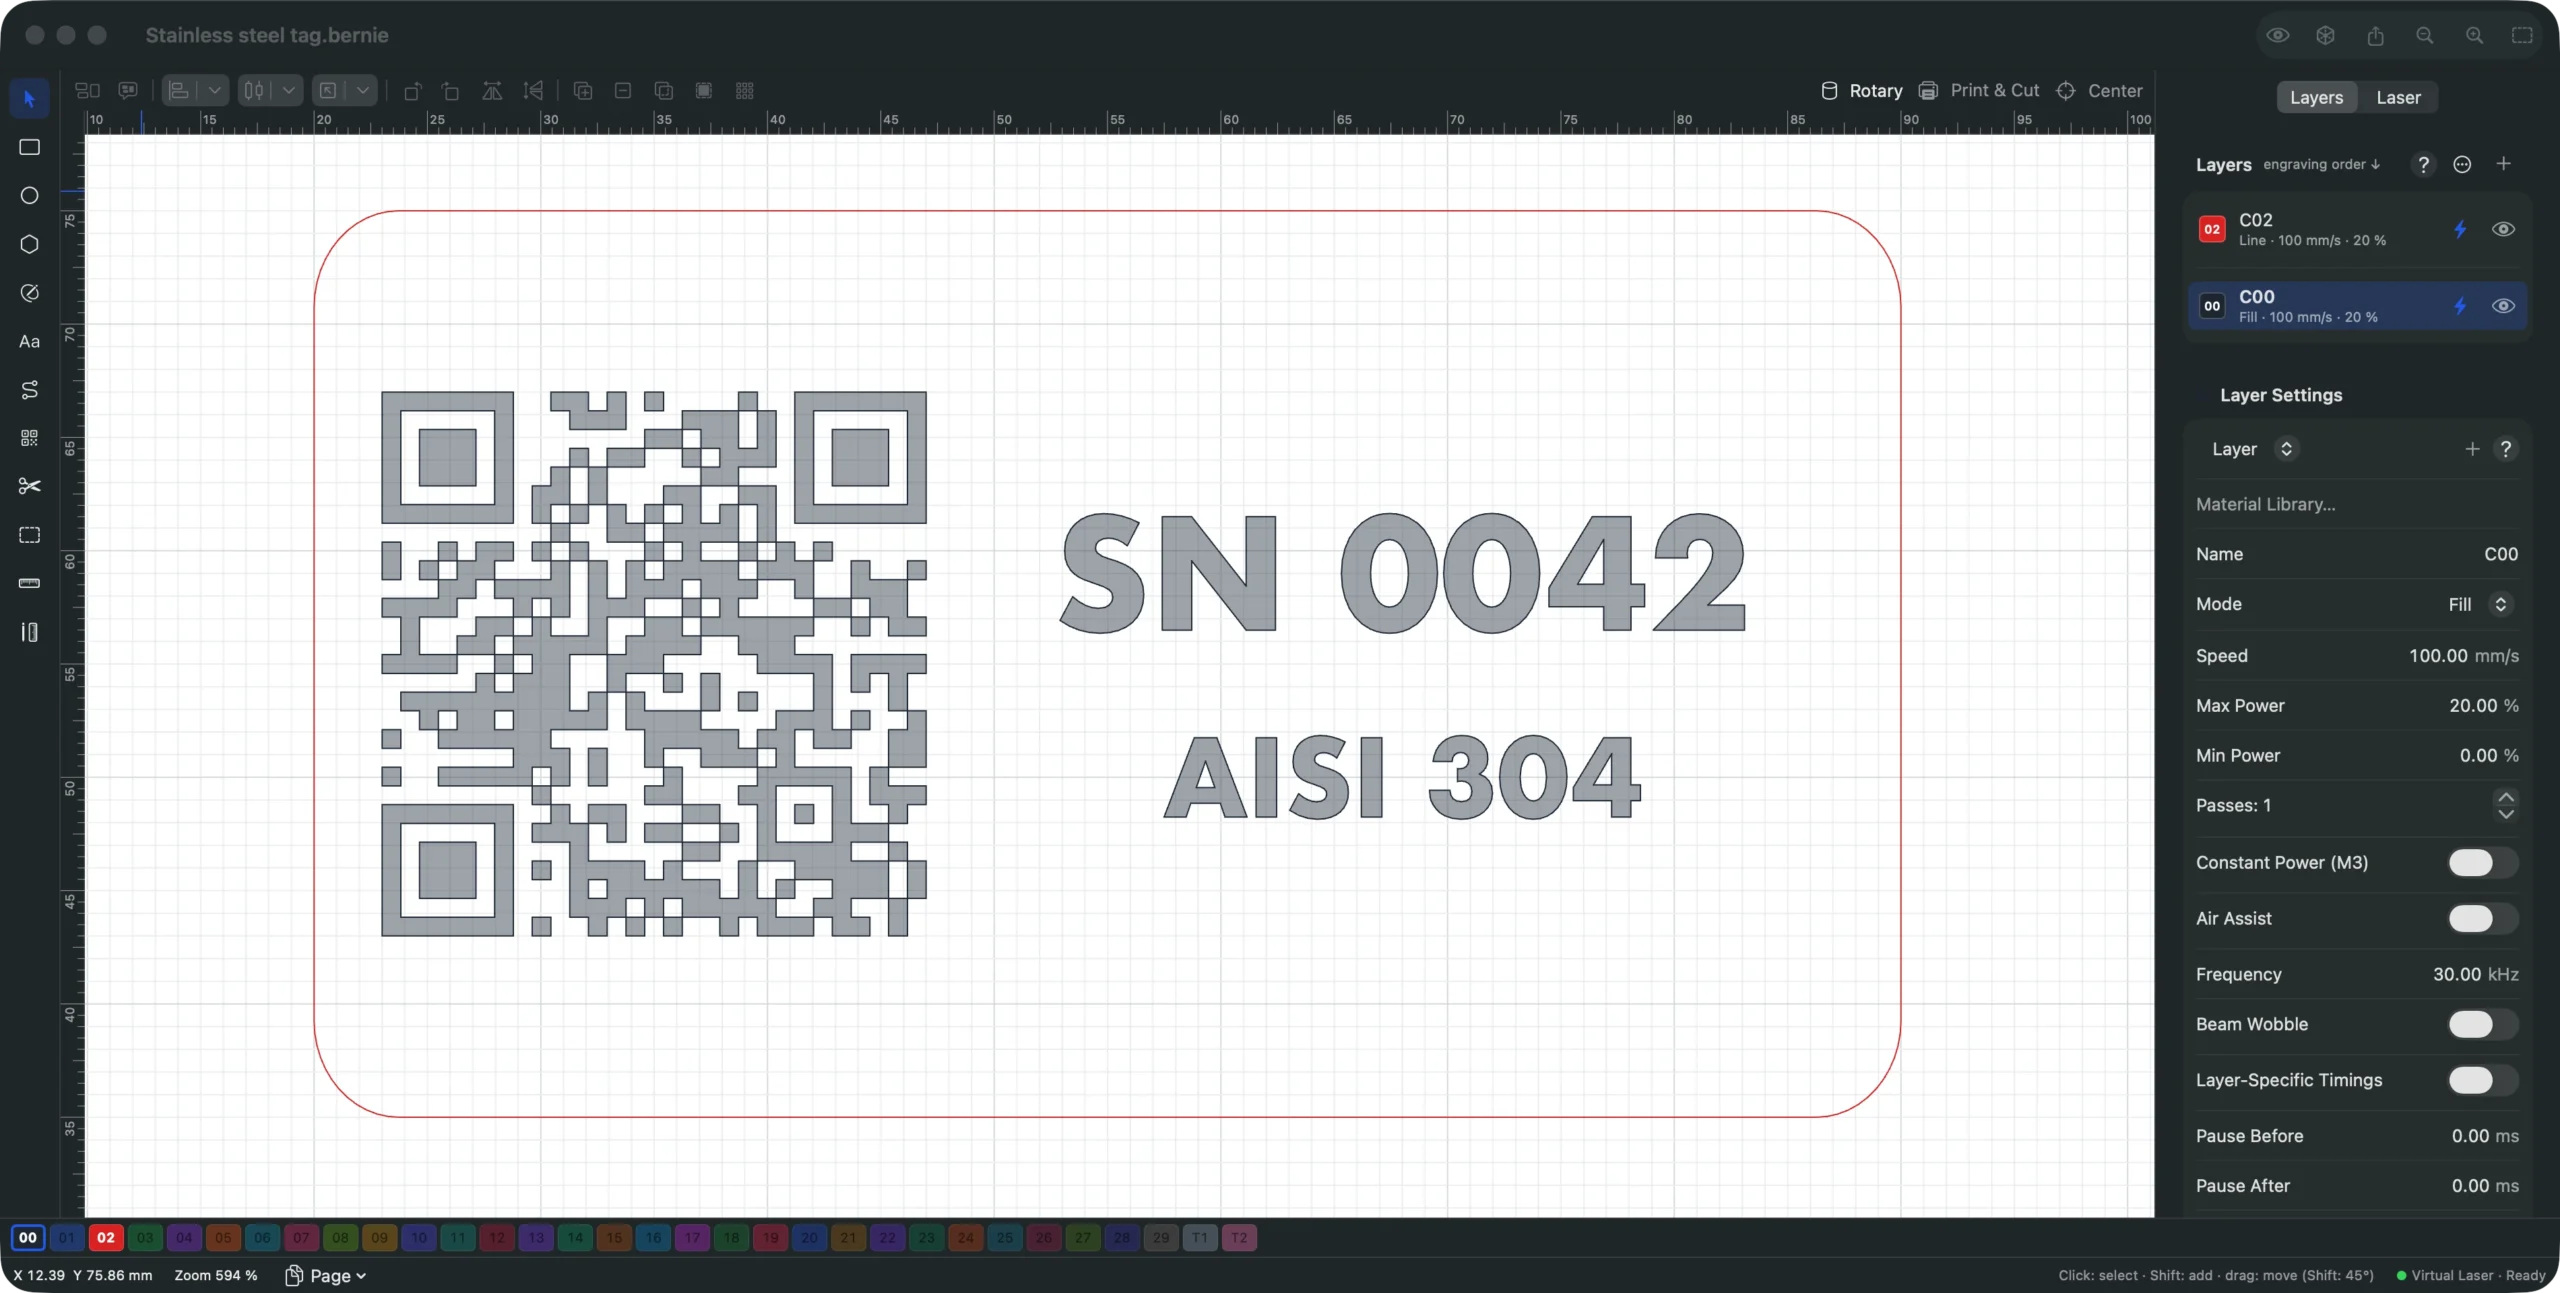
The settings stay with the layer, and the layer with the project: next time, open the tag, change the starting number in Variable Text… and mark the next batch. The manual’s Galvo Lasers section details every device and layer setting, including beam wobble, dot width and layer-specific delays.
Mark your first stainless tag for free
Repeat these steps with your own fiber laser: Bernie is free, with no account and no subscription. It runs on Mac, Windows, Linux and in your browser with Bernie Studio, which drives the galvo board in Chrome or Edge.
Common problems when marking stainless steel
The mark is grey, not black
Not enough heat in the surface. Lower the speed, tighten the line interval, raise the frequency, or add a second pass, one change at a time. Clean the steel first with isopropyl alcohol: oil and fingerprints give patchy marks.
Brown, blue or gold halos around the mark
Too much heat: the oxide layer grows thick enough to show interference colors. Speed up, lower the power or let the part cool between passes (a Pause After on the layer in Bernie). The same effect, controlled, is how MOPA lasers make colors on stainless steel; it depends a lot on the grade and finish.
Lines show in the fill
The interval is wider than the mark of the beam. Reduce it, turn on cross-hatch, or use bidirectional fill with properly set delays: too short a laser-on or laser-off delay leaves missing or burnt dots at the ends of the lines.
The mark is sharp in the middle and blurred at the edges
The lens field is not flat at its edges, or the part is not at the focus height everywhere. Keep small parts near the center of the field and check the lens corrections with the calibration pattern (Calibrate Lens in Bernie).
The QR code does not scan
Black annealing reads best: the dark modules contrast with the bright steel. Make the code larger (each module at least 0.5 mm), add a quiet zone around it, and avoid a light etch on a polished surface, which can read inverted.
Safety with fiber lasers
The 1064 nm beam of a fiber laser is invisible and reflects off metal. Wear goggles rated for 1064 nm (not the orange diode glasses), keep the enclosure or the shield closed, extract the fumes, especially from coated or painted parts, and never leave the machine marking alone. Keep the red pointer framing on until the part is in place: it is the safe way to check the position.
Stainless steel, marked the right way
Choose the kind of mark first, black, light or deep, then let a test card find the speed, frequency and interval for your source and your steel. Save the winner as a material, and every next tag is a matter of placing it under the red pointer. Bernie does it for free, with a virtual galvo that checks the job before you fire; download it, see the compatible machines, and if it saves you an afternoon, a donation keeps it free for everyone.
Can you laser engrave stainless steel with a diode laser?
Not directly: bare stainless steel reflects most of a diode laser’s light. With a metal marking spray or paste, a diode laser bonds a dark layer to the surface, which works well for labels. For a mark in the steel itself, or a deep engraving, you need a fiber laser.
What are the best fiber laser settings for black on stainless steel?
A black annealed mark comes from heat, not depth: slow speed (around 100 to 400 mm/s), a fine line interval (0.01 to 0.03 mm), a high frequency and moderate power, sometimes slightly out of focus. The exact values depend on the source and the steel, so run a small test card that changes one setting at a time.
What is the difference between laser marking and laser engraving?
Marking changes the surface, by color or a very thin layer, and leaves it smooth; engraving removes material and leaves a groove you can feel. On stainless steel, black annealing is marking, and deep engraving takes many passes at high power.
Does laser marking make stainless steel rust?
Annealing keeps the surface intact, which is why it is used on medical and food equipment. Ablation and deep engraving remove the protective film, so these marks can stain in harsh conditions unless the part is cleaned and passivated.
Is there free software for fiber laser marking?
Yes. Bernie is free laser software, funded by donations, with a galvo mode for fiber, MOPA and UV lasers: frequency and pulse width per layer, a virtual galvo, direct control of EZCad2 JCZ boards and export to EZCad. It runs on Mac, Windows, Linux and in the browser with Bernie Studio.