To laser engrave a tumbler, you lay it on a rotary attachment that turns the cup under the beam while the head moves along it. Measure the tumbler’s diameter, tell your software how far the rotary turns for a given move, check it with a one-turn test, then draw the design on a flat template as wide as the engraved area and as tall as the cup’s circumference. Focus on the top of the curve, frame, and engrave a powder-coated or stainless tumbler in one go.
Below: what you need, rollers or chuck, how the rotary math works, a complete tutorial in free software, how to handle tapered cups, and the problems that ruin most first tumblers.
What you need to engrave a tumbler
A flat bed laser can only mark the top strip of a cylinder: a few millimetres away from the top, the surface drops out of focus. A rotary solves that by turning the cup, so the point being engraved is always at the top. Here is the kit.
Before you start
- A laser that marks your tumbler: diode and CO2 lasers ablate powder coat and paint; bare stainless steel needs a fiber laser, or a marking spray with a diode or CO2.
- A rotary attachment made for your machine, rollers or chuck, with its distance per rotation from the manufacturer.
- Calipers to measure the diameter where you will engrave.
- A spare tumbler or a coated offcut to test speed and power first.
- Fume extraction and goggles rated for your laser’s wavelength.
Most diode lasers have no dedicated rotary port: the rotary plugs in where the Y motor was, and the software turns Y moves into rotation. Many CO2 and some diode controllers have a separate A axis instead. Either works; you just tell the software which one you use.
Rollers or chuck: which rotary for tumblers
| Roller rotary | Chuck rotary | |
|---|---|---|
| How it holds the cup | The cup rests on two pairs of wheels | Jaws grip the rim or the inside |
| Best for | Straight tumblers, bottles, cans | Tapered cups, wine glasses, mugs with handles |
| Setup per cup | Fast: drop it on and level it | Slower: clamp, center, support the far end |
| Diameter setting | Does not change the scale | Sets the scale: measure every cup |
| Typical problem | Slipping on a light or slippery cup | Wobble if the cup is not centered |
A roller rotary drives the cup through its wheels, so every cup turns by the same surface distance for a given motor move, whatever its diameter. That is why, on rollers, the object diameter only tells the software how long the circumference is. A chuck turns the cup itself: a bigger cup covers more surface per degree, so the diameter you enter sets the scale of the whole job. Measure each cup on a chuck.
The rotary math in one paragraph
The circumference is the diameter times pi: a tumbler of 80 mm (3.15 in) has a circumference of about 251.3 mm. A design that goes all the way around is therefore 251.3 mm long in the direction the cup rolls. The distance per rotation is the move the controller must make to turn the rotary exactly once; the manufacturer gives it, and a one-turn test confirms it. Get it wrong, and a circle comes out as an oval and the wrap-around design overlaps or leaves a gap.
How to laser engrave a tumbler in Bernie
Bernie is free laser software, funded by donations, with rotary support among its camera, rotary and Print & Cut tools. Here is the whole job on a straight 80 mm tumbler, with the mountain and lettering design from the screenshots.
- Measure the tumbler. With calipers, take the diameter where the design will go, and the height of the band you can engrave between the lid line and the bottom curve. If the top and bottom diameters differ, note both and the length of the wall: the cup is tapered (step 8).
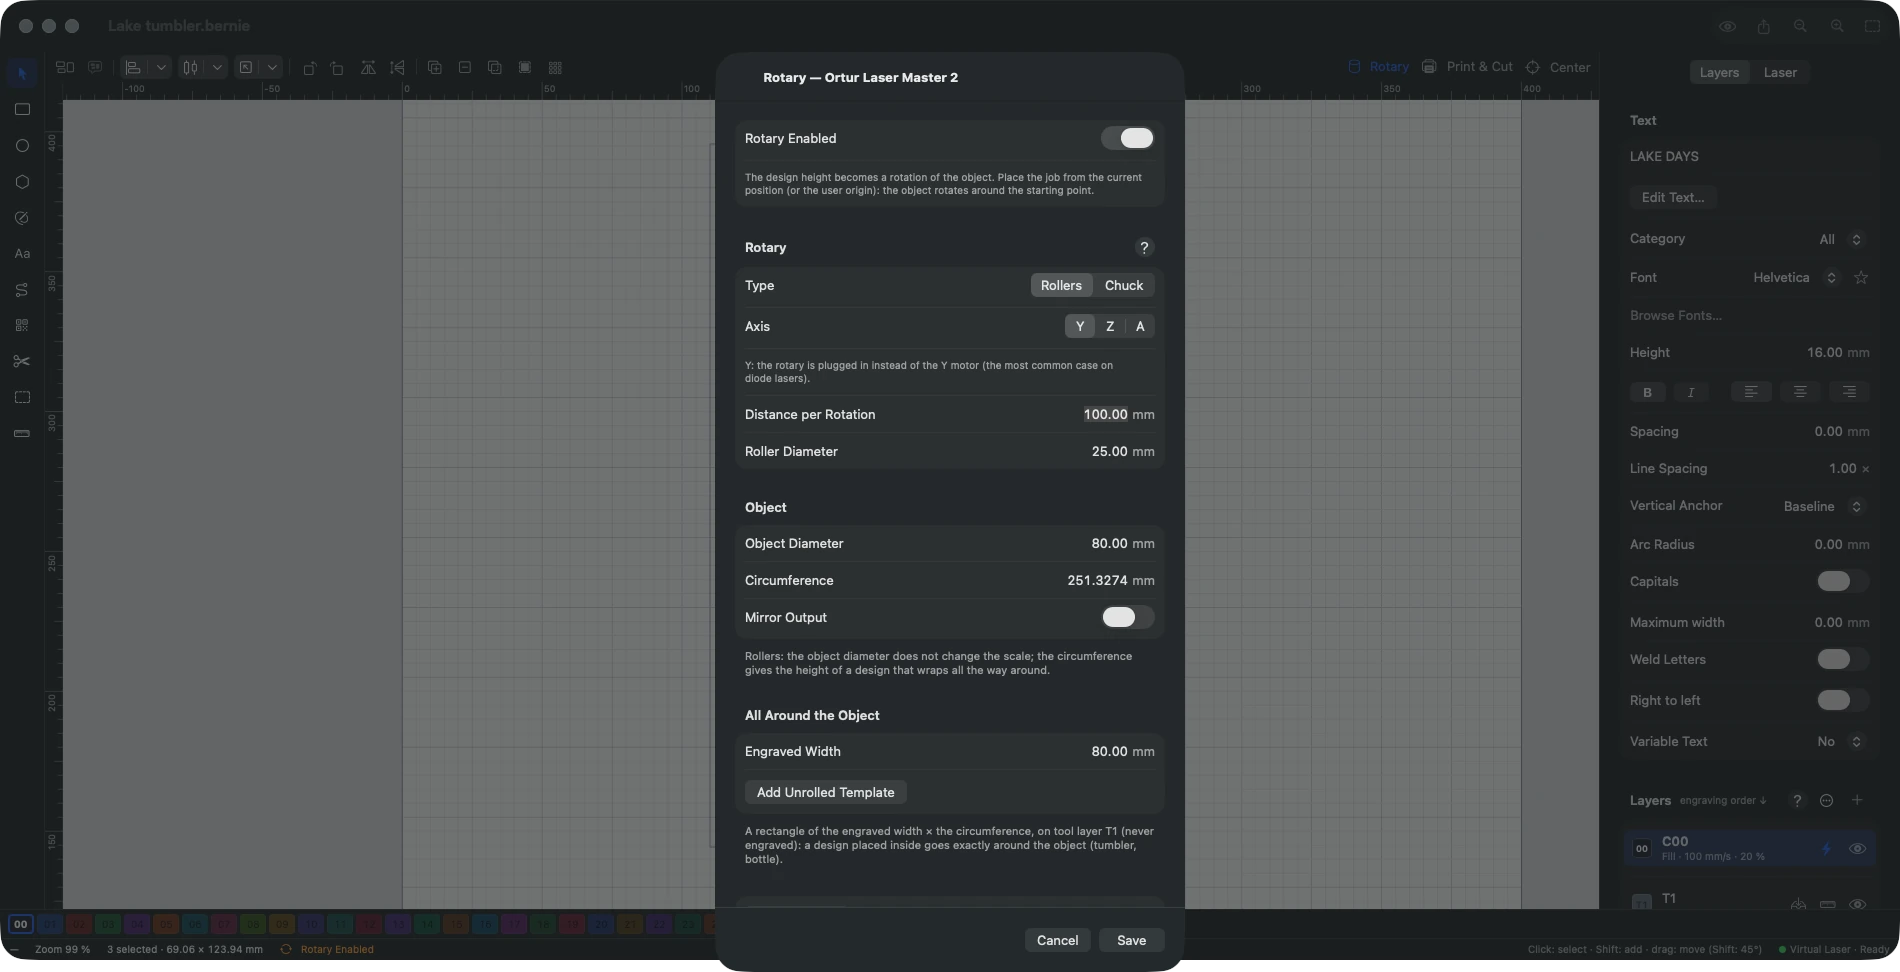
- Open the rotary settings. Choose Laser › Rotary… (⇧⌘R), or click Rotary in the modes bar above the canvas. Tick Rotary Enabled, then pick the Type (Rollers or Chuck) and the Axis: Y when the rotary is plugged in instead of the Y motor, the most common case on diode lasers, or Z or A for a dedicated axis.
- Enter the rotary’s numbers. Type the Distance per Rotation from the rotary’s manual and, for rollers, the Roller Diameter. Under Object, enter the Object Diameter you measured, 80 mm here; Bernie shows the Circumference next to it (251.3 mm). Tick Mirror Output only if the cup turns the wrong way.
- Test the rotation. Put a piece of tape on the cup as a mark and click Test Rotation: one full turn, a one-second pause, then back, laser off. If it turns too far, reduce the Distance per Rotation; not far enough, increase it. Then Save: the rotary settings are stored with the device and with the project.
- Add the unrolled template. Back in the rotary settings, under All Around the Object, enter the Engraved Width (the band height from step 1) and click Add Unrolled Template. A rectangle of that width by the circumference appears on tool layer T1, which is never engraved: everything you place inside it goes exactly once around the cup.
- Lay out the design. In rotary mode, the height of the design becomes a rotation of the cup. Lettering that should read around a standing tumbler therefore runs up the canvas: rotate text and artwork 90° so the tops of the letters point to the tumbler’s rim. Use the text and drawing tools, or import an SVG logo.
- Set the layer. Put the design on a layer in Fill mode. For a fill on a rotary, keep the scan lines parallel to the cup’s axis: an angle of 0° when the cup unrolls along Y, 90° otherwise. Take a speed and power from the material library, then confirm them with a Material Test on a spare cup or a coated offcut.
- Correct a tapered cup. For a flared tumbler, select the design and choose Tools › Tapered Object…. Set where the Object Top is on the design, the Top Diameter, Bottom Diameter, Object Length, the distance From Object Top to Design and the Rotary Setup Diameter, then click Apply: the design is widened where the cup is narrower and narrowed where it is wider, so it keeps its proportions.
- Place, preview and engrave. Level the cup on the rotary, focus on the top of the curve, and move the head over the point where the job should begin. In the Laser panel, set Start From to Current Position (or User Origin): the cup turns around that starting point. Turn on the preview to check the paths and the time, click Frame to watch the head and the cup trace the outline, laser off, then Start.
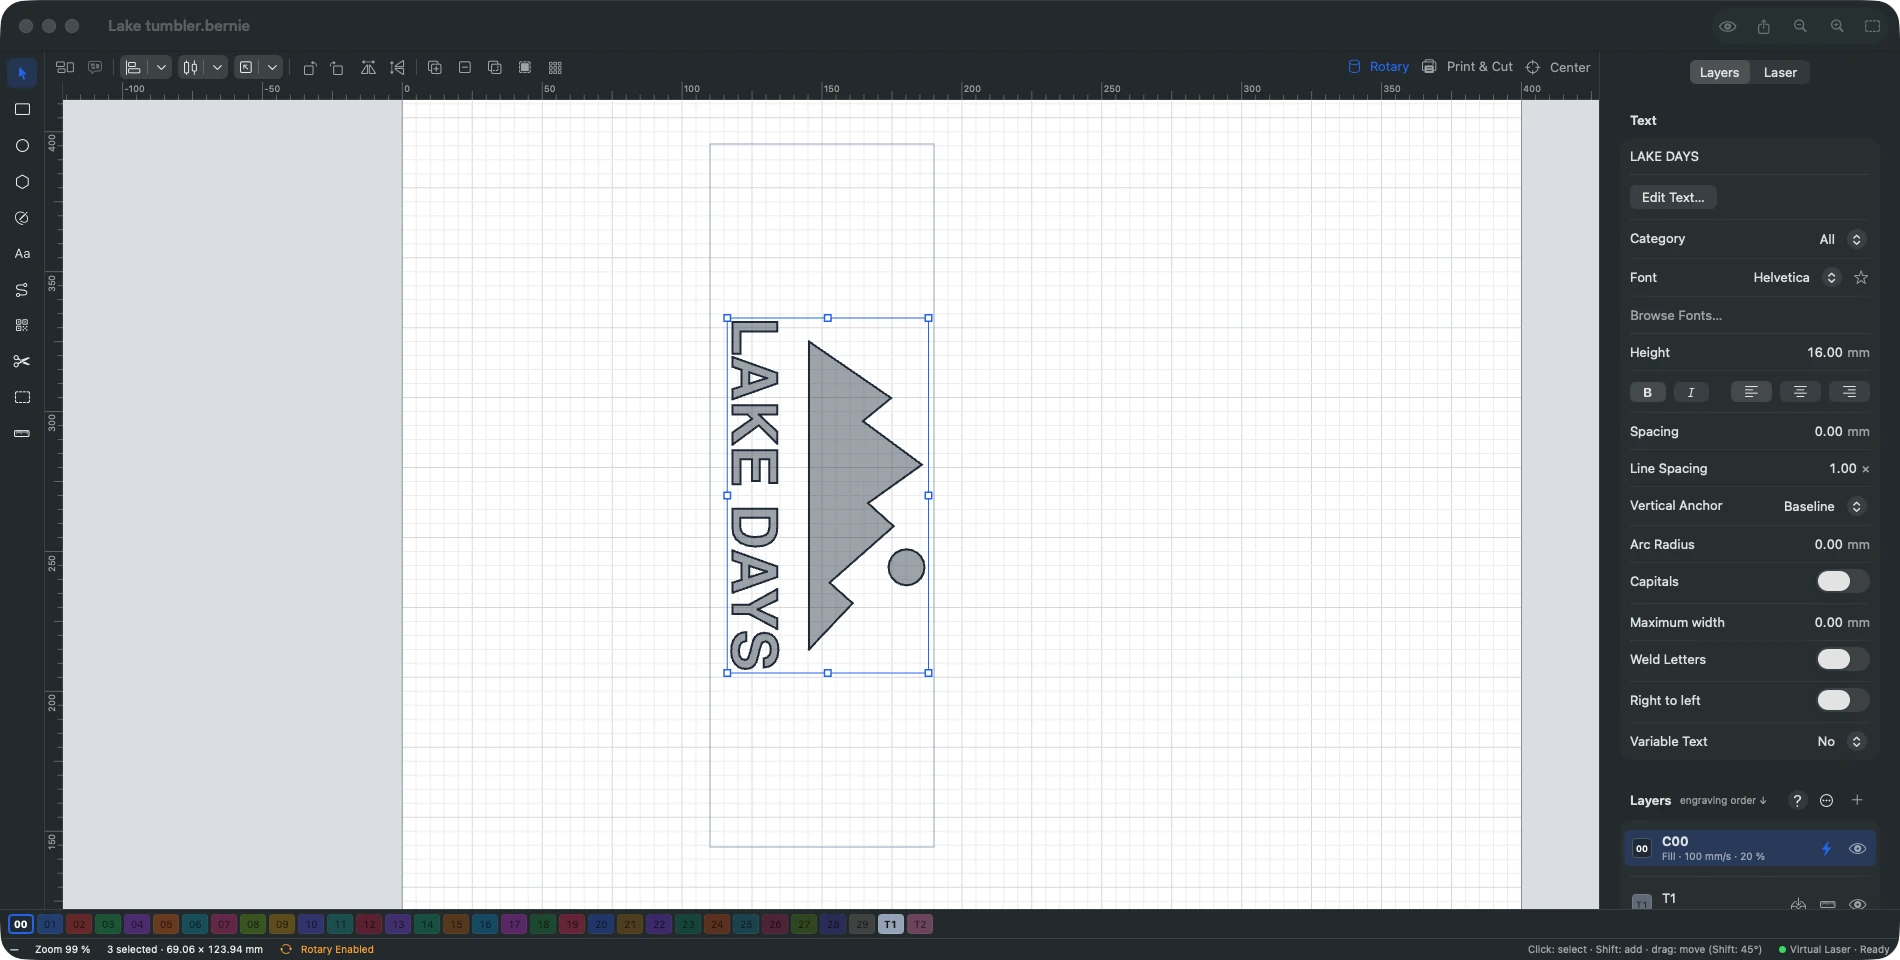
In the example, the template is 80 mm wide, the band we can engrave, and 251.3 mm tall, the circumference of the cup. The lettering and the mountains sit side by side across it, rotated so that, once the cup stands upright, the peaks are above the words and both read around the tumbler.
To arch the words over the artwork instead of setting them straight, see how to curve text for laser engraving.
The status bar reminds you when the rotary is on, and the Rotary button stays highlighted in the modes bar: turn it off before your next flat job, or the Y moves will spin the rotary instead of moving the head. If you open a project saved with different rotary settings, Bernie offers to use them.
Engrave your first tumbler for free
Repeat these steps with your own rotary and design: Bernie is free, with no account and no subscription. It runs on Mac, Windows, Linux, iPad and in your browser with Bernie Studio, and the iPhone app is its pocket companion.
Tumbler engraving settings: where to start
There is no universal setting: coatings differ from brand to brand, and a 10 W diode does not behave like a 60 W CO2. What does not change is the method.
- Powder-coated tumblers: the laser removes the coating and reveals the steel underneath. Aim for the lowest power that takes the coating off cleanly in one pass; a second, quick pass often brightens the steel. Too much power leaves a brown haze.
- Painted or anodised cups: same idea, lower power; anodised aluminium marks white.
- Bare stainless: a fiber laser marks it directly. With a diode or CO2, use a marking spray or paste, then wash off what the beam did not fuse.
- Glass: a CO2 laser frosts it. Lower power and a damp paper towel or a thin layer of dish soap help prevent chips.
- Line interval: around 0.1 mm (254 lines per inch) is a common start for solid fills on coatings; finer intervals take longer without looking better.
Run a small grid of speeds and powers on the bottom of a spare tumbler or on a coated scrap first; our guide to laser engraving settings by material explains how to read the result. Turn on air assist if your machine has it: it keeps smoke off the lens and the cup.
Safety first
Powder coatings and paints release fumes when they burn: extract them outside or through a filter, and never engrave a coating that may contain PVC or vinyl. Wear goggles rated for your laser’s wavelength, keep a fire extinguisher at hand and never leave the machine running unattended.
Common tumbler engraving problems and fixes
| Problem | Likely cause | Fix |
|---|---|---|
| Design squashed or stretched around the cup | Wrong distance per rotation | Run Test Rotation and adjust until it makes exactly one turn |
| Wrap-around design overlaps or leaves a gap | Wrong diameter (chuck) or design taller than the circumference | Measure again; use the unrolled template |
| Lettering upside down or mirrored | Design not rotated, or rotary turning the other way | Rotate the design 90°; tick Mirror Output |
| Ghost lines or doubled edges | Cup slipping on the rollers | Slower speed, rubber rings, a weight inside the cup |
| Design wider at one end on a flared cup | Taper not corrected | Use Tapered Object |
| Faint edges, sharp centre | Focus too far from the surface on a small cup | Focus on the top of the curve; keep the design band narrow |
| Brown haze on the steel | Too much power | Lower the power; add a quick cleaning pass |
Level the cup
Most tumblers are wider at the rim than at the base, so on rollers the top of the cup is not horizontal. Raise the low end of the rotary, or pack the base of the cup, until the top line is level: otherwise the focus changes along the design and one side comes out fainter.
Mind the handle and the seam
Start the job where the design should begin, not at a random point. On a mug, place the handle so the design ends before it, and on a wrap-around design, put the seam (where the start and end meet) behind the handle or at the back.
Can you engrave a tumbler without a rotary?
On a diode or CO2 laser you can engrave a narrow strip along the top of a cup laid in a cradle, a few millimetres wide, but the edges blur as the surface curves away. A galvo laser can do more: Bernie’s cylinder correction marks a cylindrical object lying flat, as long as the design stays within a quarter turn on either side of the top. For a full wrap, galvo users switch to the galvo rotary, which marks the design slice by slice; see galvo and fiber. If you are still choosing a machine, our diode, CO2, fiber or galvo guide compares them, and the compatible machines page lists what Bernie drives.
Frequently asked questions
How do you laser engrave a tumbler with a diode laser?
Put the tumbler on a rotary plugged in instead of the Y motor, enter the rotary’s distance per rotation and the cup’s diameter in your software, and check it with a one-turn test. Then lay the design out on a template as tall as the circumference, focus on the top of the cup and engrave.
What size should a tumbler wrap design be?
As wide as the band you can engrave and as long as the circumference, which is the diameter times 3.1416. A tumbler of 80 mm needs a design about 251 mm long to go all the way around.
Do you need a rotary to engrave a tumbler?
For anything wider than a thin strip, yes. Without one, the curved surface leaves the focus a few millimetres from the top. A galvo laser with cylinder correction can mark a wider area on a cup lying flat, but a full wrap still needs a rotary.
Why is my tumbler engraving stretched or squished?
The distance per rotation is wrong, or, on a chuck rotary, the diameter. Run a one-turn test and adjust: if the rotary turns too far, reduce the distance per rotation; not far enough, increase it.
How do you engrave a tapered tumbler?
Level the cup so the top line is horizontal, then correct the design for the taper: in Bernie, Tools › Tapered Object widens the design where the cup is narrower. Short designs on a slight taper often work without correction.
A tumbler is one of the most rewarding laser jobs once the rotary is set up: measure, test one turn, lay out on the template, engrave. Try it with Bernie, free on Windows, Linux and in the browser, and if it saves you an afternoon, consider supporting its development.